


7
Operation Guide 3173 3246
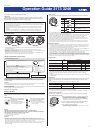
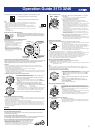
Specifying Temperature, Barometric Pressure, and Altitude Units
Use the procedure below to specify the temperature, barometric pressure, and altitude units to be used in
the Barometer/Thermometer Mode and the Altimeter Mode.
Important!
When
TYO
(Tokyo) is selected as the Home City, the altitude unit is set
automatically to meters (
m
), the barometric pressure unit to hectopascals
(
hPa
), and the temperature unit to Celsius (
°C
). These settings cannot
be changed.
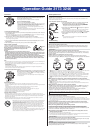
To specify temperature, barometric pressure, and altitude units
1. In the Timekeeping Mode, hold down
E
until the currently selected
city code starts to fl ash. This is the city code setting screen.
• Before the city code starts to fl ash, the message SET Hold
will appear on the display. Keep
E
depressed until SET Hold
disappears and the city code starts to fl ash.
2. Keep pressing
D
until
UNIT
appears in the upper left corner of the
screen.
• See step 3 under “To change the current time and date settings”
for information about how to scroll through setting screens.
3. Perform the operations below to specify the units you want.
To specify this unit: Press this key: To toggle between these settings:
Altitude
A
m
(meters) and
ft
(feet)
Barometric Pressure
B
hPa
(hectopascals) and
inHg
(inches of mercury)
Temperature
C
°C
(Celsius) and
°F
(Fahrenheit)
4. After the settings are the way you want, press
E
twice to exit the setting screen.
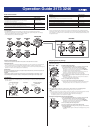
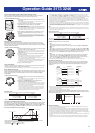
Precautions Concerning Simultaneous Measurement of Altitude and Temperature
Though you can perform altitude and temperature measurements at the same time, you should remember
that each of these measurements requires different conditions for best results. With temperature
measurement, it is best to remove the watch from your wrist in order to eliminate the effects of body heat.
In the case of altitude measurement, on the other hand, it is better to leave the watch on your wrist,
because doing so keeps the watch at a constant temperature, which contributes to more accurate altitude
measurements.
• To give altitude measurement priority, leave the watch on your wrist or in any other location where the
temperature of the watch is kept constant.
• To give temperature measurement priority, remove the watch from your wrist and allow it to hang freely
from your bag or in another location where it is not exposed to direct sunlight. Note that removing the
watch from your wrist can affect pressure sensor readings momentarily.
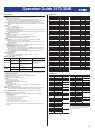
Viewing Altitude Records
Use the Data Recall Mode to view manually saved altitude readings and automatically saved high altitude,
low altitude, total ascent, and total descent values. Altitude data records are created and saved in the
Altimeter Mode.
To view altitude records
1. Use
D
to select the Data Recall Mode (
REC
) as shown in “Selecting
a Mode”
.
• About one second after REC appears on the display, the display
will change to show the fi rst record of the memory area you were
viewing when you last exited the Data Recall Mode.
2. Use
B
to select the memory area you want.
REC 01
(Manually Saved
Record Area)
(Auto Save
Value Area 1)
MAX-1
(Auto Save
Value Area 2)
MAX-2
3. Use
A
and
C
to scroll through the screens for an area and display the one you want.
REC
01
REC
02
REC
25
Manually saved records
MAX MIN ASC DSC
Auto saved values
• While a manually saved record (REC 01 through REC 25) is displayed, the bottom of the screen
will alternate between the date (month, day) and time (hour, minute) the record was created.
• While MAX or MIN auto saved values are displayed, the bottom of the screen will alternate
between the date (month, day) and time (hour, minute) the value was recorded.
• While ASC or DSC auto saved values are displayed, the bottom of the screen will alternate
between the date (month, day) and year that the ASC or DSC record was fi rst created.
• For detailed information about auto saved values, see “Auto Save Values”.
l
l
l
l
l
l
l
l
l
l
l
l
l
l
l
l
l
l
l
l
l
l
l
l
l
l
l
l
l
l
l
l
l
l
l
l
l
l
l
l
l
l
l
l
l
l
l
l
l
l
l
l
l
l
l
l
l
l
l
l
l
l
l
l
l
l
l
l
l
l
l
l
l
l
l
l
l
l
l
l
l
l
l
l
l
l
l
l
l
l
l
l
l
l
l
l
l
l
l
l
l
l
l
l
l
l
l
l
l
l
l
Record name
Altitude
Alternates between
measurement time
(Hour : Minutes) and
measurement date
(Month Day)
Record name
Altitude
Alternates between
measurement time
(Hour : Minutes) and
measurement date
(Month Day)
AltitudeAltitude
AltitudeAltitude
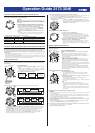
4. After you are fi nished viewing data, use
D
to exit the Data Recall Mode.
• ---- will be displayed if data has been deleted or if there is no corresponding data due to error, etc.
In such cases, total ascent (ASC) and total descent (DSC) values will show zero.
• When the total ascent (ASC) or total descent (DSC) exceeds 99,995 meters (or 327,980 feet), the
applicable value will restart from zero.
• If the total ascent (ASC) or total descent (DSC) value becomes
fi ve digits, the leftmost (ten thousand) digit will appear in the upper
right of the display. The nearby illustration shows the display when
the ASC-1 value is 99995 meters.
To clear the contents of a specifi c memory area
1. Use
D
to enter the Data Recall Mode.
2. Use
B
to select the memory area you want to clear.
• Note that the contents of the memory area you select will be
deleted as soon as you perform step 3 below. The clear operation
cannot be undone, so double check to make sure you really want
to delete the contents of the memory area you select here.
3. Hold down
E
until
CLR Hold
appears on the display and then
disappears. Release
E
after
CLR
disappears.
• This will clear the memory area you selected in step 2 and then
return to the data display screen, which now shows ----. This
indicates there is nothing stored in the currently displayed memory
area.
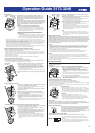
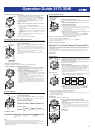
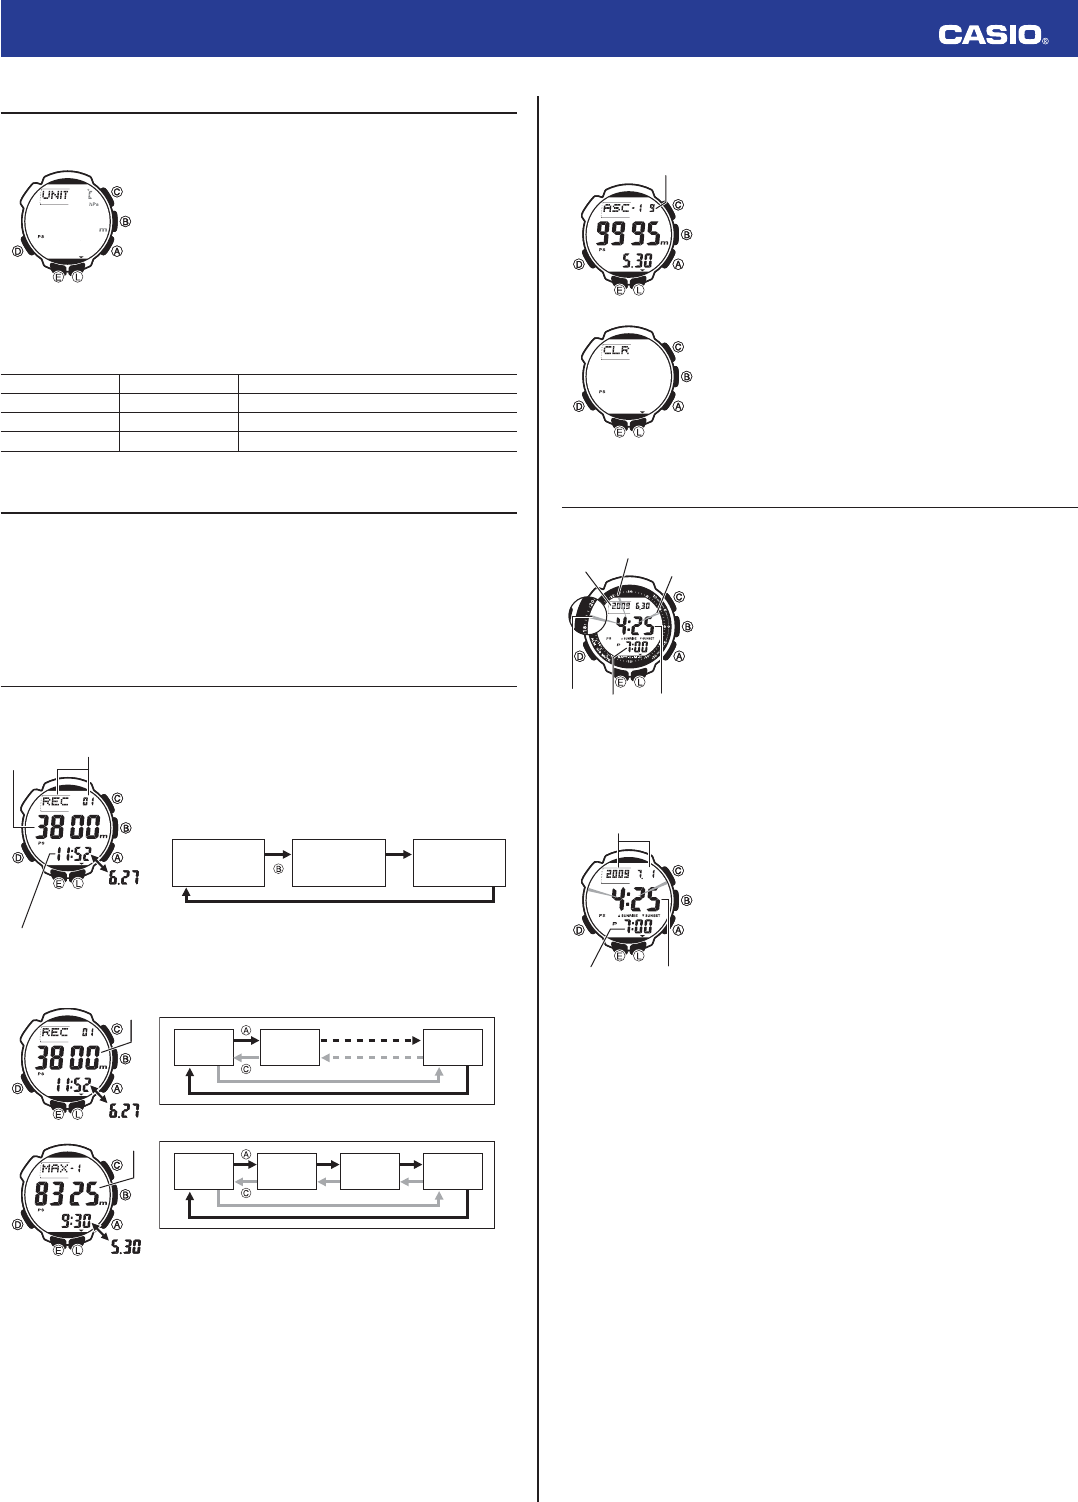
Looking up Sunrise and Sunset Times
You can use the Sunrise/Sunset Mode to look up the sunrise and sunset times for a particular date (year,
month, day) and location.
To enter the Sunrise/Sunset Mode
While in the Timekeeping Mode, press
D
to enter the Sunrise/Sunset
Mode.
• This will display the sunrise and sunset times for the current date
based the currently specifi ed city code, latitude, and longitude.
• The three Daylight Pointers described below are on the display in the
Sunrise/Sunset Mode.
Pointer 1: Sunset time in 24-hour format
Pointer 2: Sunrise time in 24-hour format
Pointer 3: This fl ashing pointer appears only when Pointer 1 and
Pointer 2 are indicating the sunrise and sunset times for the current
Timekeeping Mode date. It indicates the current Timekeeping Mode
time in 24-hour format.
• Before trying to use the Sunrise/Sunset Mode, you need to confi gure
settings for the city code, longitude, and latitude for the location whose
sunrise and sunset times you want to view.
• The factory default confi guration of the location is: City Code:
TYO
(Tokyo); Latitude: North 36 degrees; Longitude: East 140 degrees.
• You can fi nd latitude and longitude for various cities around the globe
in the “Site Data List”.
To view the sunrise/sunset time for a particular date
1. Enter the Sunrise/Sunset Mode.
• This will display the sunrise and sunset times for the current
date at the location specifi ed by the city code, latitude, and
longitude.
2. While the sunrise/sunset time are on the display, use
A
(+) and
C
(–)
to scroll through the dates.
• The sunrise and sunset times for the selected date will be
indicated by values and pointers.
• You can select any date between January 1, 2000 and December
31, 2099.
Note
• Sunrise/sunset time is displayed in 5-minute units.
•
If you think that the sunrise and/or sunset times are not correct for
some reason, check the watch’s city code, longitude and latitude
settings.
• The sunrise and sunset times displayed by this watch are times at
sea level. Sunrise and sunset times are different at altitudes other
than sea level.
To look up the sunrise and sunset times for a specifi c city code
Important!
• You do not need to perform this procedure to look up the sunrise and sunset times in your currently
selected Home City.
• If you select a different city code to look up the sunrise and sunset times there, return to the city
code of your Home City (your current location) when you are fi nished. Otherwise, the time shown
in the Timekeeping Mode will not be correct.
• For information about the Home City setting, see “Confi guring Home City Settings”.
1. In the Timekeeping Mode, hold down
E
until the currently selected city code starts to fl ash. This is the
city code setting screen.
• Before the city code starts to fl ash, the message SET Hold will appear on the display. Keep
E
depressed until SET Hold disappears and the city code starts to fl ash.
2. Use
A
(East) and
C
(West) to select the city code whose sunrise and sunset times you want to view.
• For details about city codes, see the “City Code Table”.
3. Press
E
twice to exit the setting screen.
Ten thousand digitTen thousand digit
Current
date
Pointer 3
Pointer 2
Sunrise
time
Sunset
time
Pointer 1
Current
date
Pointer 3
Pointer 2
Sunrise
time
Sunset
time
Pointer 1
Date
Sunset time Sunrise time
Date
Sunset time Sunrise time