


USER’S GUIDE 2568
4
Warning!
• Always make sure you are in a safe place whenever you are reading the
display of the watch using the auto light switch. Be especially careful when
running or engaged in any other activity that can result in accident or injury.
Also take care that sudden illumination by the auto light switch does not
surprise or distract others around you.
• When you are wearing the watch, make sure that its auto light switch is turned
off before riding on a bicycle or operating a motorcycle or any other motor
vehicle. Sudden and unintended operation of the auto light switch can create a
distraction, which can result in a traffic accident and serious personal injury.
To turn the auto light switch on and off
In the Timekeeping Mode, hold down B for about two seconds to toggle the auto light
switch on (
displayed) or off ( not displayed).
• The auto light switch on indicator (
) is on the display in all modes while the auto
light switch is turned on.
Battery
This watch is equipped with a solar cell and a rechargeable battery (secondary
battery) that is charged by the electrical power produced by the solar cell. The
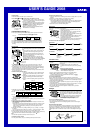
illustration shown below shows how you should position the watch for charging.
Example: Orient the watch so its face is
pointing at a light source.
• Note that charging efficiency drops
when any part of the solar cell is
blocked by clothing, etc.
• The illustration shows how to position
a watch with a resin band.
Important!
• Storing the watch for long periods in an area where there is no light or wearing it in
such a way that it is blocked from exposure to bright light can cause rechargeable
battery power to run down. Be sure that the watch is normally exposed to bright light
whenever possible.
• This watch employs a solar cell that converts light into electricity, which charges a
built-in rechargeable battery. Normally, the rechargeable battery should not need
replacement, but after very long use over a number of years, the rechargeable
battery may lose its ability to achieve a full charge. Should you notice problems with
getting the rechargeable battery to a full charge, contact your dealer or CASIO
distributor about having the rechargeable battery replaced.
• The rechargeable battery should be replaced with a CASIO-specified ML2016
battery only. Other rechargeable batteries can cause damage to the watch.
• All data stored in memory is deleted, and the current time and all other settings
return to their initial factory defaults whenever battery power drops to Level 5 and
when you have the battery replaced.
• Turn on the watch’s Power Saving function and keep it in an area normally exposed
to bright light when storing it for long periods. This helps to keep the rechargeable
battery from going dead.
Solar cell
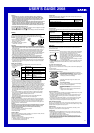
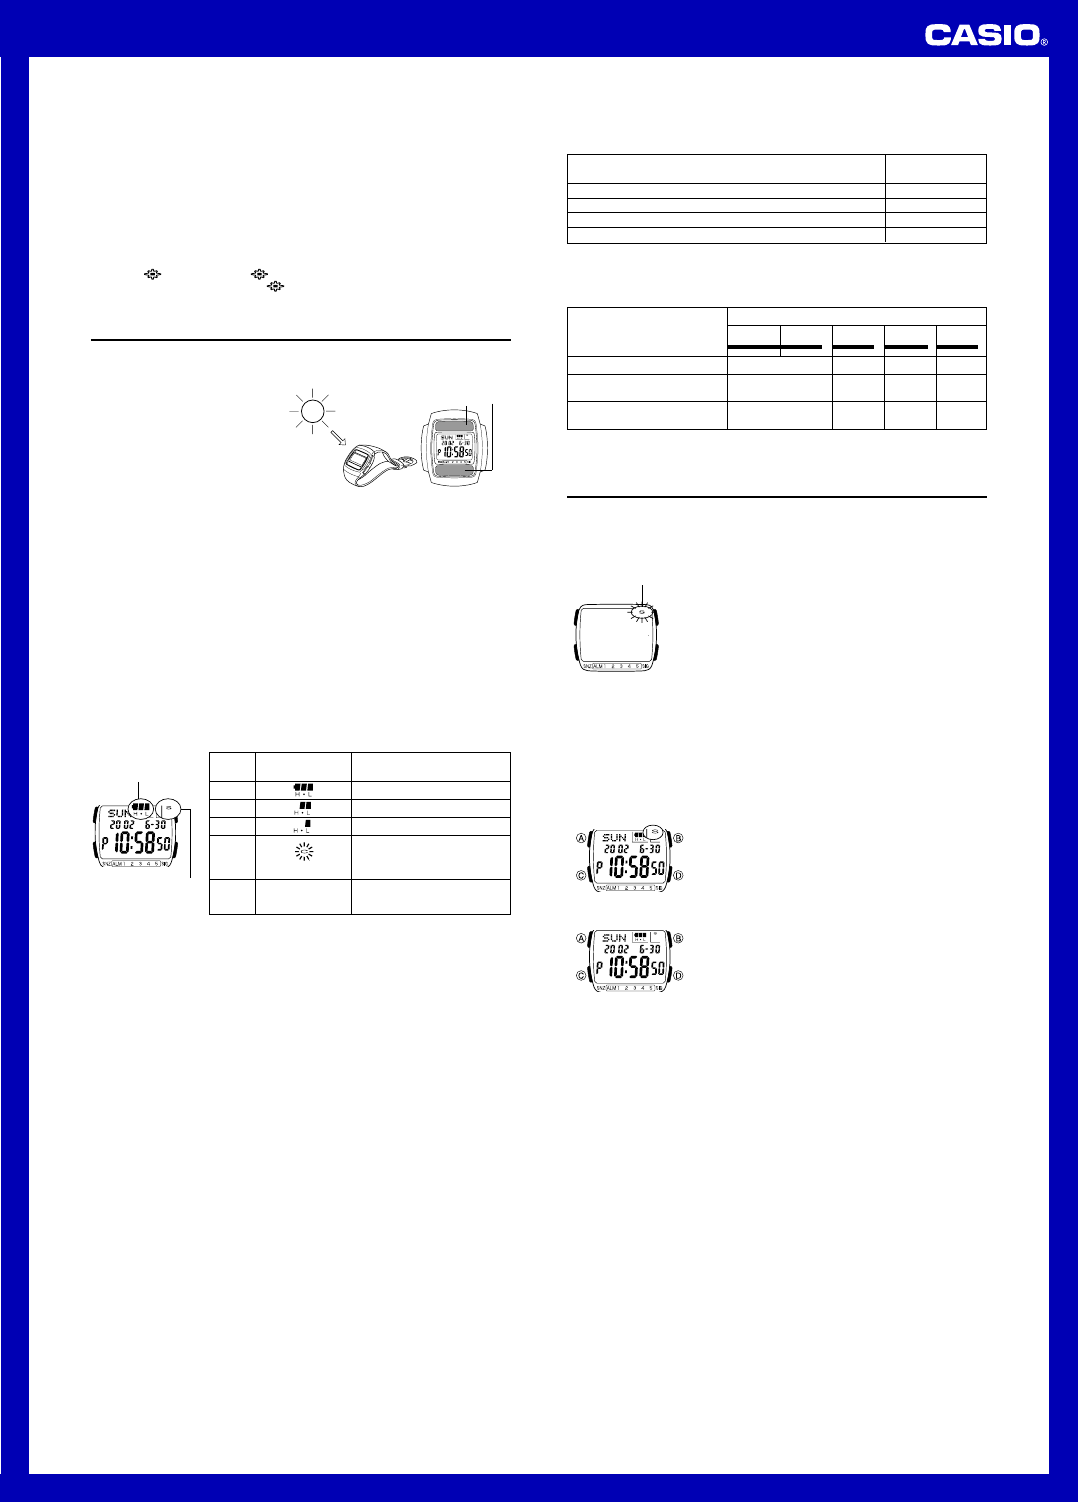
Battery Power Indicator
The battery power indicator on the display shows you the current status of the
rechargeable battery’s power.
Function Status
All functions enabled.
All functions enabled.
All functions enabled.
Beeper tone, backlight,
display, and buttons are
disabled.
All functions, including
timekeeping, are disabled.
Level
1
2
3
4
5
Battery Power
indicator
(Charge Soon Alert)
Battery power
indicator
Power Saving on (S)/
Charge (C)/Recover (R)
indicator
• The flashing charge (C) indicator at Level 4 tells you that battery power is very low,
and that exposure to bright light for charging is required as soon as possible.
• At Level 5, all functions are disabled and settings return to their initial factory
defaults. Functions are enabled once again after the rechargeable battery is
charged, but you need to set the time, date, and all other settings after the battery is
recharged to Level 3 from Level 5. Though the time appears on the display after the
battery is charged to Level 4 (indicated by flashing charge (C) indicator), you will not
be able to change the time, date, and all other settings until the battery reaches
Level 3 (no charge (C) indicator) .
• Leaving the watch in direct sunlight or some other very strong light source can
cause the battery power indicator to temporarily show a reading that is higher than
the actual battery level. The correct battery power indicator should appear after a
few minutes.
• If you use the backlight or any of the alarm functions a number of times during a
short period, the recover (R) indicator appears on the display and the following
operations become disabled until battery power recovers.
Backlight; Beeper tone
After some time, battery power will recover and the recover (R) indicator will
disappear, indicating that the above functions are enabled again.
Charging Precautions
Certain charging conditions can cause the watch to become very hot. Avoid leaving
the watch in the areas described below whenever charging its rechargeable battery.
Also note that allowing the watch to become very hot can cause its liquid crystal
display to black out. The appearance of the LCD should become normal again when
the watch returns to a lower temperature.
Warning!
Leaving the watch in bright light to charge its rechargeable battery can cause it
to become quite hot. Take care when handling the watch to avoid burn injury.
The watch can become particularly hot when exposed to the following
conditions for long periods.
• On the dashboard of a car parked in direct sunlight
• Too close to as incandescent lamp
• Under direct sunlight
Charging Guide
After a full charge, timekeeping remains enabled for up to about six months, while the
watch is used under the conditions described below.
Operating Conditions
•
Watch is not exposed to light
•
Display on 18 hours per day, sleep state 6 hours per day
•
1 backlight operation (1.5 seconds) per day
•
10 seconds of alarm operation per day
Charge Times
Exposing the watch to light for the periods shown below each day restores the power
used by the above operating conditions.
• Stable operation is promoted by frequent charging.
Exposure Level (Brightness) Approximate
Exposure Time
Outdoor Sunlight (50,000 lux) 5 minutes
Sunlight Through a Window (10,000 lux) 24 minutes
Daylight Through a Window on a Cloudy Day (5,000 lux) 48 minutes
Indoor Fluorescent Lighting (500 lux) 8 hours
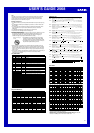
Recovery Times
The table below shows the amount exposure that is required to take the battery from
one level to the next.
• The above exposure time values are all for reference only. Actual required exposure
times depend on lighting conditions.
Exposure Level
(Brightness)
Outdoor Sunlight (50,000 lux)
Sunlight Through a Window
(10,000 lux)
Daylight Through a Window
on a Cloudy Day (5,000 lux)
Approximate Exposure Time
Level 5 Level 4 Level 3 Level 2 Level 1
▲
▲
▲
33 hours
166 hours
– – –
3 hours
16 hours
33 hours
16 hours
80 hours
162 hours
2 hours
12 hours
25 hours
▲
Reference
This section contains more detailed and technical information about watch operation.
It also contains important precautions and notes about the various features and
functions of this watch.
Power Saving Function
When turned on, the Power Saving function automatically
puts the watch into a sleep state whenever it is left in an
area where it is dark for about one hour in the
Timekeeping Mode or Auto Display screen. The sleep
state is indicated by a blank screen with Power Saving on
(S) indicator flashing on it. In the sleep state, all functions
are enabled, except for the display.
• Wearing watch inside the sleeve of clothing can cause it
to enter the sleep state.
Power saving on indicator
• The watch will not enter the sleep state between 6:00 AM and 9:59 PM. If the watch
is already in the sleep state when 6:00 AM arrives, however, it will remain in the
sleep state.
To recover from the sleep state
Perform any one of the following operations.
• Move the watch to a well-lit area. It can take up to five seconds for the display to turn
on.
• Press any button.
• Angle the watch towards your face for reading.
To turn Power Saving on and off
In the Timekeeping Mode, hold down D for about two
seconds to toggle Power Saving on (S indicator displayed)
and off (S indicator not displayed).
• Note that pressing D also toggles between 12-hour
timekeeping and 24-hour timekeeping.
Auto Display
Auto Display continually changes the contents of the
digital display.
To turn off Auto Display
Press any button (except for B) to turn off Auto Display.
This returns to the Timekeeping Mode.
To turn on Auto Display
Hold down C for about three seconds until the watch
beeps.
• Note that Auto Display cannot be performed while a
setting screen is on the display.
Auto return features
• After you perform any button operation (except for the backlight button) in any mode,
pressing C returns directly to the Timekeeping Mode.
• If you leave the watch in the Data Bank, Alarm, and Day Counter Mode for two or
three minutes without performing any operation, it automatically changes to the
Timekeeping Mode.
• If you leave a screen with flashing digits or a cursor on the display for two or three
minutes without performing any operation, the watch automatically saves any
settings you have made up to that point and exits the setting screen.
Data and Setting Scrolling
The B, C, and D buttons are used in various modes and setting screens to scroll
through data on the display. In most cases, holding down these buttons during a scroll
operation scrolls through the data at high speed.
Initial Screens
When you enter the Data Bank, Alarm, or Day Counter Mode, the data you were
viewing when you last exited the mode appears first.
Timekeeping
• Resetting the seconds to 00 while the current count is in the range of 30 to 59
causes the minutes to be increased by 1. In the range of 00 to 29, the seconds are
reset to 00 without changing the minutes.
• The year can be set in the range of 2000 to 2039.
• The watch’s built-in full automatic calendar automatically makes allowances for
different month lengths and leap years. Once you set the date, there should be no
reason to change it except after you have the watch’s battery replaced or when
battery power drops to Level 5.