


USER’S GUIDE 2456
3
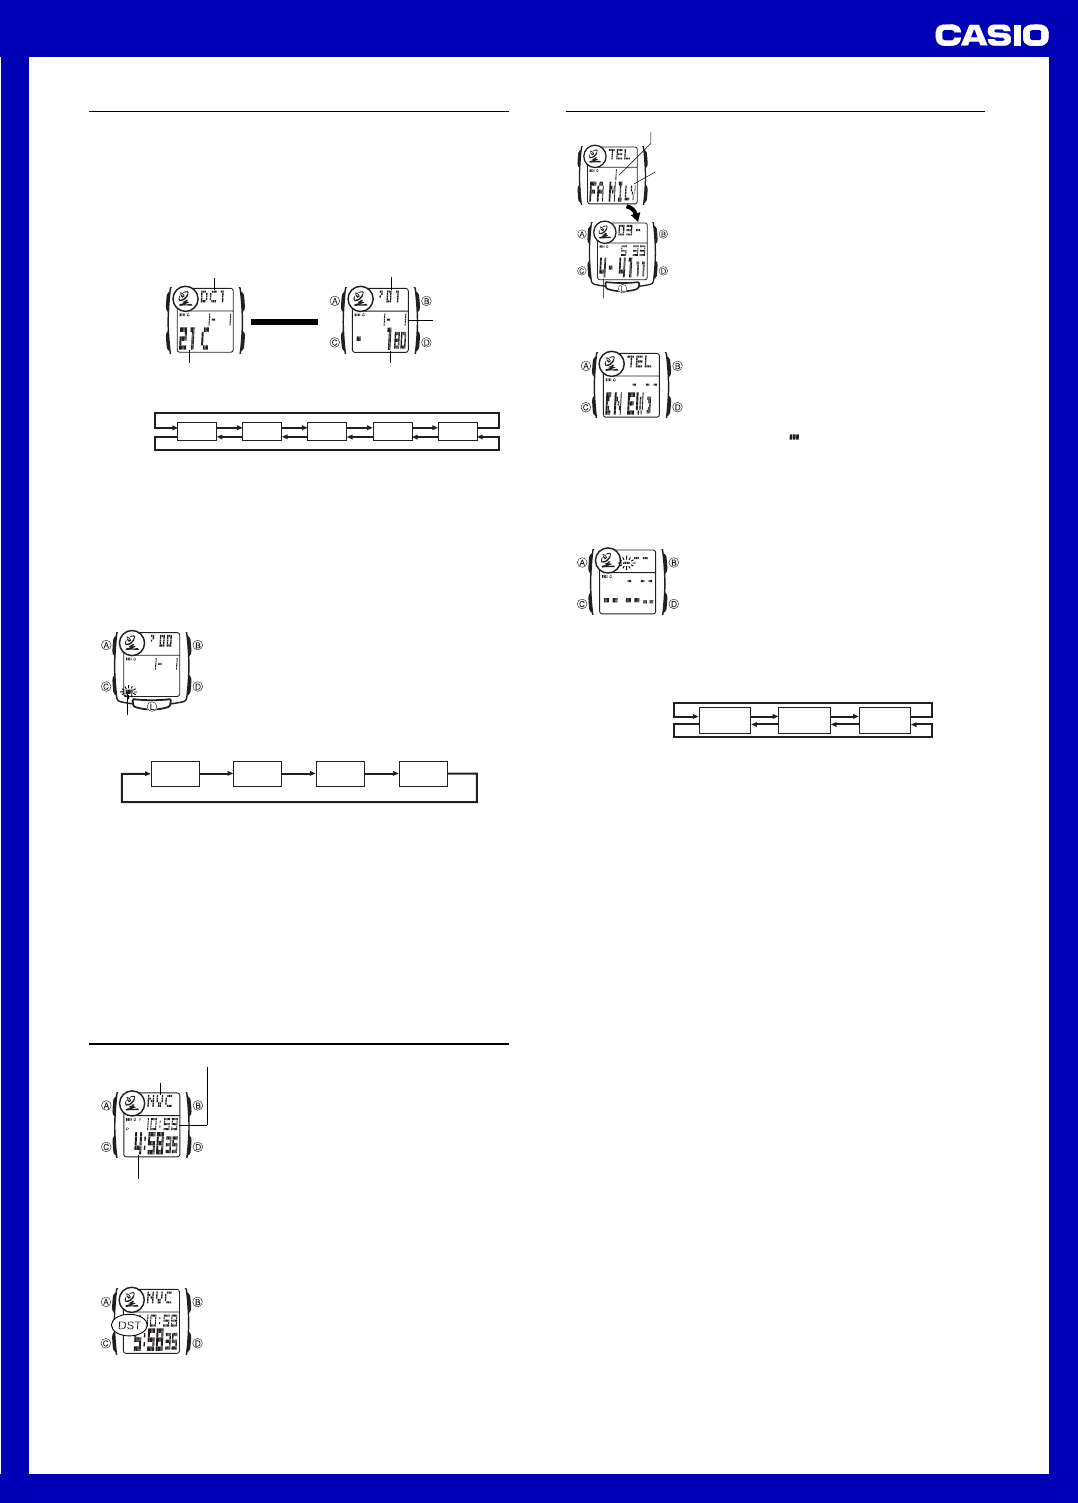
World Time
World Time shows the current time in 28 cities (29
time zones) around the world.
• For full information on city codes, see the “City
Code Table” at the back of this manual.
• All of the operations in this section are performed in
the World Time Mode, which you enter by pressing
C (page E-4).
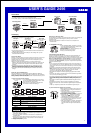
To view the time in another city code
While in the World Time Mode, press D to scroll
forward through the city codes (time zones) and B
to scroll back.
• If the current time shown for a city is wrong, check
your Timekeeping Mode time and Home City
settings and make the necessary changes.
Current time in the
selected city code
City code
Timekeeping Mode time
To toggle a city code time between standard time and Daylight Saving Time
1.In the World Time Mode, use B and D to display
the city code (time zone) whose standard time/
Daylight Saving Time setting you want to change.
2.Hold down A for about two seconds to toggle
Daylight Saving Time (DST displayed) and
standard time (DST not displayed).
• The “DST” indicator is on the display whenever
you display a city code for which Daylight Saving
Time is turned on.
• Note that the DST/Standard Time setting affects only the currently
displayed city code. Other city codes are not affected.
• Daylight Saving Time (DST) advances the time setting by one hour from
Standard Time. Remember that the not all countries or even local areas
use Daylight Saving Time.
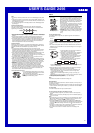
Telememo
Telememo lets you store up to 20 records, each
containing name and telephone number data.
Records are automatically sorted based on the
characters of the name. You can recall records by
scrolling through them on the display.
• See “Character List” at the back of this manual for
details on how the watch sorts records.
• Your watch comes preset with three Telememo
records with the names “FAMILY,” “HOME,” and
“OFFICE,” without any phone numbers. You can
change or delete these records if you want.
• All of the operations in this section are performed in
the Telememo Mode, which you enter by pressing
C (page E-4).
Telephone number
Name
Memory number
To create a new Telememo record
1.In the Telememo Mode, press B or D until a
record showing the name “NEW” (indicating the
new record input screen) appears.
• If the message “FULL” appears on the display, it
means that memory is full. To store another
record, you will first have to delete some of the
records stored in memory.
2.Hold down A until the flashing cursor ( ) appears on the display, which
indicates the setting screen.
3.Input a name.
• When inputting the name, use B and D to cycle through characters at
the current cursor location, and C to move the cursor to the right. See
“Inputting Text” on page E-39.
• You can input up to eight characters for the name.
-
4.After you input the name, press C as many times
as necessary to display the number input screen.
• You can input up to eight characters for the
name. When the cursor is located at the eighth
space of the name, moving the cursor to the right
causes it to jump to the first digit of the number.
When the cursor is at the 12th digit of the
number, moving it to the right (by pressing C)
causes it to jump to the first character in the
name.
5.Input a telephone number.
• Use B and D to change the character (hyphen, number, or space) at the
cursor position. The character changes in the following sequence.
6.When the character you want is at the cursor position, press C to move the
cursor to the right.
0 to 9
–
(space)
Press D.
Press B.
7.Repeat steps 5 and 6 until you complete number input.
• You can input up to 12 digits for the number.
• The number initially contains all hyphens. You can leave the hyphens or
replace them with numbers or spaces.
8.Press A to store your data and return to the Telememo record screen
(without the cursor).
• When you press A, the message “SORT” appears on the display for a few
seconds. After the sort operation is complete, the watch returns to the
Telememo record screen (without the cursor).
To edit a Telememo record
1.In the Telememo Mode, scroll through the records and display the one you
want to edit.
2.Hold down A until the flashing cursor appears on the display.
3.Use C to move the flashing to the character you want to change.
4.Use B and D to change the character.
5.After making the changes that you want, press A to store them and return
to the Telememo record screen.
To delete a Telememo record
1.In the Telememo Mode, scroll through the records and display the one you
want to delete.
2.Hold down A until the flashing cursor appears on the display.
3.Hold down L until the message “CLEAR” appears on the display.
• At this time the cursor appears on the display, ready for input.
4.Input data or press A to return to the Telememo record screen.
To recall Telememo records
In the Telememo Mode, use D (+) and B (–) to scroll through Telememo
records on the display.
• Only the memory number and name of each Telememo record appear on the
display as you scroll through Telememo records. If you leave the memory
number/name screen on the display for about two seconds, it changes to the
phone number screen.
• Pressing A while the phone number screen is on the display switches to the
memory number/name screen for about two seconds.
Day Counter
The Day Counter lets you count the number of days from the Timekeeping
Mode’s current date to a specific target date.
• There are five Day Counter records, each of which can be set with its own
text and target date (year, month, day).
• All of the operations in this section are performed in the Day Counter Mode,
which you enter by pressing C (page E-4).
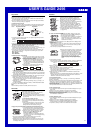
To recall Day Counter records
Whenever you enter the Day Counter Mode, the Day Counter Number screen
appears for about two seconds, followed by the corresponding Target Date
screen.
• In the Day Counter Mode, use B and D to cycle through the Day Counter
number screens as shown below.
▲
Day counter number
Day Counter Number
Target Date
Target year
Target
Month – Day
Day counter
Text
• A Day Counter Number screen remains on the display for about two seconds,
after which it is replaced by the corresponding Target Date screen. Pressing
A while a Target Date screen is on the display switches to the corresponding
Day Counter Number screen for about two seconds.
• The day counter value has a plus sign (+) in front of it when the
corresponding target date comes after the current date, or a minus sign (–) in
front of it when the target date comes before the current date.
• Your watch comes preset with the following Day Counter text settings. You
can use these as they are or change them to something else, if you want.
DC1: 21C (21ST century)
DC2: PAYDAY
DC3: BIRTHDAY
Press D.
Press B.
DC1 DC3 DC4 DC5DC2
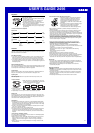
To make Day Counter record settings
1.In the Day Counter Mode, use B and D to scroll
through the Day Counter Number screens until the
one you want is on the display.
2.Hold down A until the flashing cursor appears on
the display, which indicates the setting screen.
• Holding down L for about two seconds at this
time clears the text (if there is any already input)
and sets the current Timekeeping Mode date as
the target date.
3.Press C to move the flashing in the sequence
shown below to select other settings.
Month
Year
Day
Text
• There are eight spaces in the text, so you have to press C eight times to
move to the Year setting.
Cursor
• When the Year setting is selected, the cursor changes for a four-digit target
year. Though the setting screen shows four digits, other screens show only
the last (rightmost) two digits.
4.When the setting you want to change is selected, use B and D to change it.
• Selecting the text causes the text input cursor to appear.
• When inputting text, use B and D to cycle through characters at the
current cursor location, and C to move the cursor to the right. See
“Inputting Text” on page E-39.
• While the year, month, or day setting is flashing, use D (+) and B (–) to
change the setting.
• You can set a target date in the range of January 1, 1940 to December 31, 2039.
5.Press A to exit the setting screen.
Note
• Use the above procedure to edit Day Counter records, too.