


2171-2
DAY COUNTER MODE
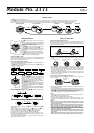
Mode indicator
Day counter
record number
Tex t
Number of days
DAYS indicator
Year
Month
Day
Target Date
The Day Counter Mode lets you count the number of days from the Timekeeping
Mode’s current date to a specific target date.
• There are five Day Counter records, each of which can be assigned up to 12 char-
acters of text and a target date.
• When a target date is reached, the DAYS indicator flashes on the display in the
Timekeeping Mode. The DAYS indicator also flashes in the Day Counter Mode
when the screen for the target date is on the display.
• The DAYS indicator flashes on the target date each year, regardless of the year
setting of the target date.
• The initial default date for a Day Counter record is 2001/1/1, and the text area
contains All spaces. (All spaces for the text display a series of hyphens “ – – – – – ”.)
Recalling Day Counter Data
In the Day Counter Mode, press
DD
DD
D to scroll through the Day Counter record screens.
• The day count is a negative value whenever the target date comes before the cur-
rent date.
• The display can show only five characters at a time. Longer text scrolls continu-
ously from right to left. The symbol “
” indicates that the character or digit to the
left is the last, and the character or digit to the right is the first.
To set the target date
1.In the Day Counter Mode, press
DD
DD
D to display a record number you want to set.
2.Hold down
AA
AA
A until the first (leftmost) text character starts to flash on the display.
This indicates the input screen.
3.Press
CC
CC
C to move the flashing in the sequence shown below. Press
EE
EE
E to move the
flashing in the opposite direction.
Press . Press .
Character 1
Day
Character 12
YearMonth
4.While the flashing is located within the text area, use
DD
DD
D or
BB
BB
B to scroll through
characters at the current location of the flashing. Holding down either button scrolls
through characters at high speed.
Press . Press .
Space A to Z
Punctuation
Japanese
characters
Hyphen SymbolsNumbers
∗
See the “CHARACTER LIST” for details.
5.While any other setting is selected, press
DD
DD
D to increase it or
BB
BB
B to decrease it.
Holding down either button changes the setting at high speed.
• Pressing
DD
DD
D and
BB
BB
B at the same time while the flashing is located within the text area
clears any input text and resets the date setting to the current date. At this time the
message “CLEAR” appears on the display.
• Pressing
DD
DD
D and
BB
BB
B at the same time while the flashing is located within the date
area resets the date setting to the current date without affecting the text.
6.After you make the settings you want, press
AA
AA
A to exit the input screen.
• The date can be set within the range of January 1, 1940 to December 31, 2039.
ALARM MODE
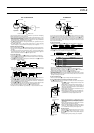
Mode indicator
Alarm number
Melody name
Hour
Minutes
Current time
You can set up to five melody alarms. When a Daily Alarm is turned on, its melody
alarm sounds for about 20 seconds at the preset time each day. Press any button
(except
EE
EE
E) to stop the melody alarm after it starts to sound. Pressing
EE
EE
E while a
melody is playing toggles the display between an animated character and the name
of the melody that is playing. When the Hourly Time Signal is turned on, the watch
beeps every hour on the hour.
To set the alarm time
1.While in the alarm Mode, press
DD
DD
D to display the alarm number you want to set.
Alarm 1 Alarm 5Alarm 2 Alarm 3 Alarm 4
SIG: 00 (Hourly Time Signal)
2.Hold down
AA
AA
A until the melody number starts to flash on the display, indicating the
setting screen. The alarm is automatically turned on at this time.
3.Press
CC
CC
C to change the selection in the sequence shown below.
Melody Name Hour Minutes
4.While melody setting is selected, use
DD
DD
D or
BB
BB
B to scroll through melody names.
Setting Alarm Sound
– 0
– 1
– 2
– 3
– 4
– 5
–
Ramdom play of melodies 1, 2, 3, 4 and 5
Melody 1
Melody 2
Melody 3
Melody 4
Melody 5
Beeper
Press .
Press .
∗
See the “MELODY LIST” for the names of melodies.
∗
Some melody alarms tune names may be displayed in abbreviated format.
• While any other setting is selected, press
DD
DD
D to increase it or
BB
BB
B to decrease it.
Holding down either button changes the setting at high speed.
5.After you make the settings you want, press
AA
AA
A to exit the setting screen.
• The format (12-hour and 24-hour) of the alarm time matches the format you select
for normal timekeeping.
• When setting the alarm time using the 12-hour format, take care to set the time
correctly as morning or afternoon.
To stop a melody alarm
• Press any button (except
EE
EE
E) to stop a melody alarm after it starts to sound.
To turn a daily Alarm or the Hourly Time Signal on and off
1.Use
DD
DD
D to display the alarm you want to turn on or off, or the screen for turning the
Hourly Time Signal on or off.
2.Press
BB
BB
B to toggle the displayed alarm or Hourly Time
Signal on and off.
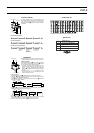
• Alarm indicator 1 is displayed in the alarm mode only. It
indicates the on/off status of the currently displayed
alarm only. Note that this indicator is used for different
purposes in other modes.
• Alarm indicator 2 is displayed in all modes when any of
the five alarms is turned on.
• Alarm indicator 3 is displayed in the Alarm Mode only.
It shows ON when the currently displayed alarm is on,
and OF when the currently displayed alarm is off.
• Hourly Time Signal indicator 1 is displayed in the Alarm
Mode only when the Hourly Time Signal is turned on.
Note that this indicator is used for different purposes in
other modes.
• Hourly Time Signal indicator 2 is displayed in all modes
when the Hourly Time Signal is turned on.
• Hourly Time Signal indicator 3 is displayed in the Alarm
Mode only. It shows ON when the Hourly Time Signal
is on, and OF when the Hourly Time Signal is off.
To test the alarm
In the Alarm Mode, display the alarm you want to sound,
and then press
EE
EE
E to play its melody or beep. You can
also press
EE
EE
E to play an alarm’s melody while setting the
alarm time.
• To stop a playing melody or beep, press any button.
Hourly Time Signal
indicator 1
Hourly Time Signal
indicator 2
Hourly Time Signal
indicator 3
Alarm indicator 1
Alarm indicator 2
Alarm indicator 3