


▼
M
O
D
E
▲
H
O
L
D
S
E
T
R
E
V
E
R
S
E
▲
F
O
R
W
A
R
D
▼
▼
M
O
D
E
▲
H
O
L
D
S
E
T
R
E
V
E
R
S
E
▲
F
O
R
W
A
R
D
▼
C
A
D
B
4. Use B or D to input letters at the cursor position. The character changes in the
following sequence. Holding down either button changes the selection at high
speed.
New data display
5. After you select the character you want, press C to advance the cursor to the right.
• Repeat steps 4 and 5 until you complete name input.
• You can input up to 8 characters in the name area. The display shows only 4
characters, but automatically scrolls from right to left to show all of the characters
that make up the text. The end of the text is indicated by an end mark “
”.
6. After the name input is through, press C until the cursor moves to the number digit.
7. While the cursor is at the number digit, use B or D to input numbers you want. The
character changes in the following sequence. Holding down either button changes
the selection at high speed.
8. After you select the character you want, press C to advance the cursor to the right.
• Repeat steps 7 and 8 until you complete number input.
9. After inputting the data you want, press A to store it into memory.
• The message “
” appears on the display and stays there while data is being
stored into alphabetical order. After the sort operation is complete, a cursor appears
on the new data display, ready for input. Press A again to return to the normal
Telememo Mode (the flashing stops). At this time, the last input Telememo data is
displayed.
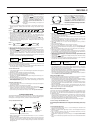
• The following shows how the display automatically changes if you do not operate
any button for a few minutes while in the Telememo Mode.
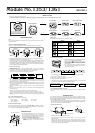
Press D
Press B
A to Z
0 to 9
(Space)
–
••
•
/
Press D
Press B
– (Hyphen)
0 to 9
(Space)
Timekeeping
Mode
A few
minutes
Data input display
(Flashing)
Normal Telememo Mode
(No flashing)
A few
minutes
To scroll through Telememo data
In the normal Telememo Mode (when the display is not flashing), press D to scroll
forward or B to scroll backward through stored data.
• The data item that is displayed when you exit the Telememo Mode will be the first
data to appear when you enter the Telememo Mode again.
To edit Telememo data
1. In the Telememo Mode, use B or D to scroll through the data items and display the
one you want to edit.
2. Hold down A until the flashing cursor appears on the display.
3. Use C to move the cursor to the character you want to change.
4. Use B or D to select the character you want.
• For details, see “To input Telememo data” (steps 4 through 5 for name input, or 7
through 8 for number).
5. After editing the data, press A to store it.
• If you do not operate any button for a few minutes while the cursor or digit is flashing
on the display, the flashing stops and the watch automatically goes back to the
normal Telememo Mode.
To delete a Telememo item
1. In the Telememo Mode, use B or D to scroll through the name data and display the
one you want to delete.
2. Hold down A until the cursor appears on the display.
3. Press B and D at the same time to delete the data (the message “
”
appears on the display). At this time, the flashing cursor appears on the display,
ready for input. Press A again to make the cursor disappear.
• If you want to input more data, start from step 3 under “To input Telememo data”.
SCHEDULE MEMO MODE
The Schedule Memo Mode lets you store the month, date, and time of each appointment,
along with an 11-character reminder message and icons. The next schedule appoint-
ment appears on the display whenever you enter the Schedule Memo Mode.
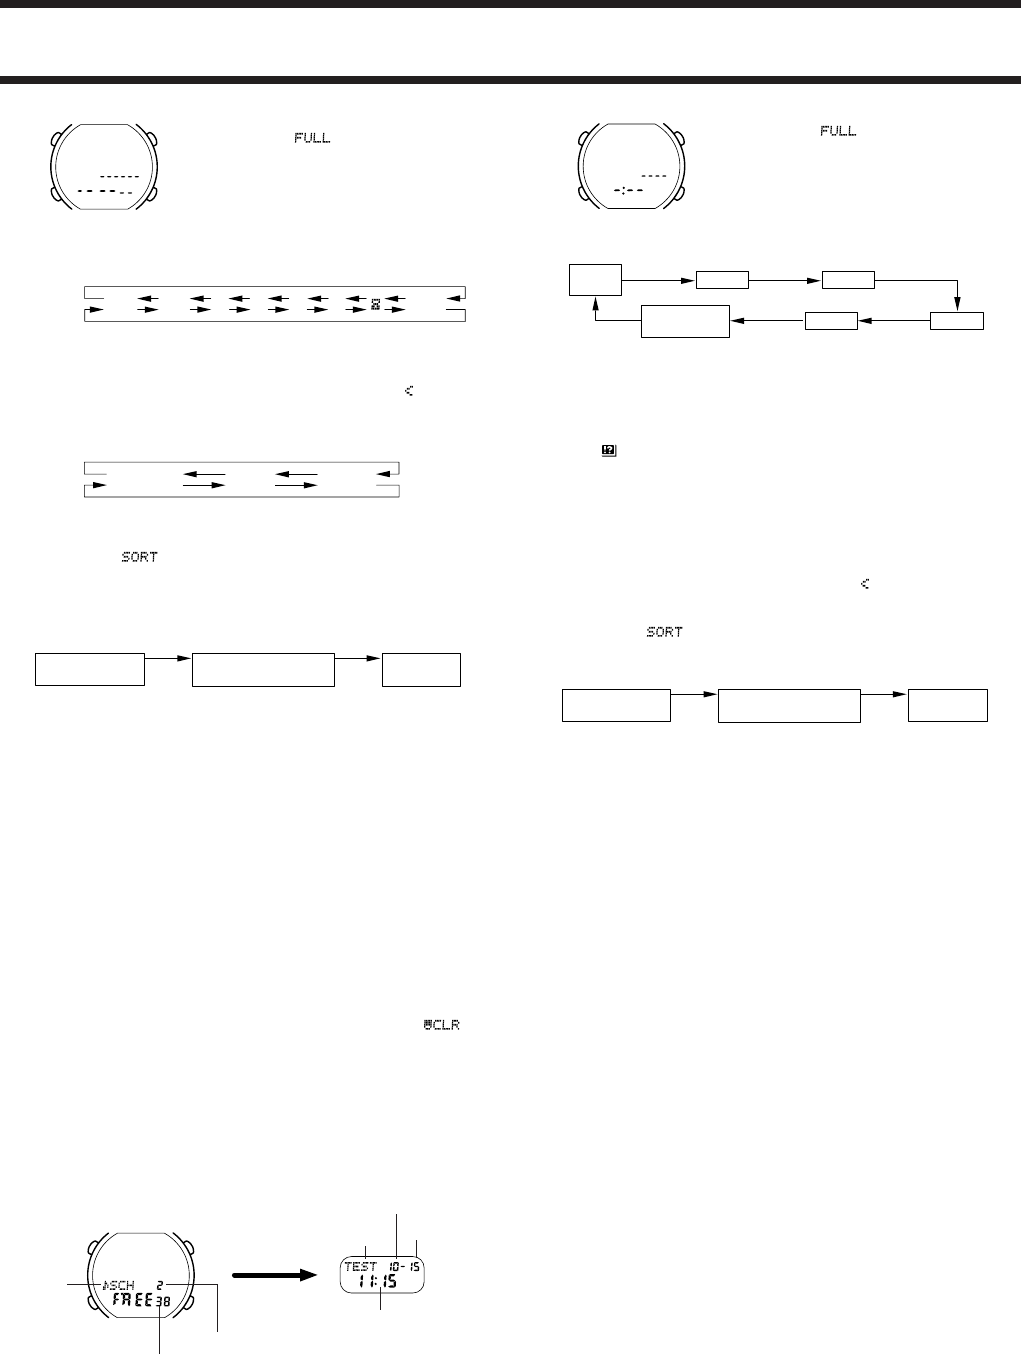
To input Schedule Memo data
Mode
indicator
C
A
D
B
Month
Date
Remaining memory capacity (number of items)
Number of items in memory
Time of the next
scheduled
appointment
Reminder
message
1. Make sure that the watch is in the Schedule Memo Mode. If not, use C to enter the
Schedule Memo Mode.
• Whenever you enter the Schedule Memo Mode, the display shows how many items
are already stored in memory, and how many items you can input before memory
becomes full. After a few seconds, the display changes to show the nearest sched-
uled appointment.
▼
M
O
D
E
▲
H
O
L
D
S
E
T
R
E
V
E
R
S
E
▲
F
O
R
W
A
R
D
▼
C
A
D
B
2. Use B or D until the new data display appears.
• If the message “ ” appears on the display, it
means that memory is full. To store more data, you
will first have to delete some from memory. Use
the procedure in “To delete a Telememo item” or
in “To delete a specific Schedule Memo item” to
delete data.
3. Hold down A until the month digits start to flash.
The month digits flash because they are selected.
New data display
4. Use C to change the selection in the following sequence.
Month
(1 ~ 12)
Message
(11 characters)
Date Hour
MinutesIcon
5. While any digits are selected (flashing), press D to increase the number or B to
decrease it. Holding down either button changes the number at high speed.
• You can skip the hour and minutes input.
• The 12-hour/24-hour format of the alarm time matches the format you select in the
Timekeeping Mode.
• Note that the Schedule Memo alarm dates you set must be within one year of the
current Timekeeping Mode date. This means that if today’s date is June 1, you can
set a Schedule Memo alarm date up to May 31 the following year.
6. When
is flashing, use B or D to move the flashing to the icon you want to
select.
7. Press C to select the icon.
• See the table under “About icons” for the meaning of each icon.
8. Use B or D to input letters at the cursor position. The character changes in the
same sequence as in the Telememo’s name input (see step 4 in “To input Telememo
data” for details).
9. After you select the character you want, press C to advance the cursor to the right.
• Repeat steps 8 and 9 to complete your message input.
• You can input up to 11 characters for message. The display shows only 4 characters,
but automatically scrolls from right to left to show all of the characters that make up
the text. The end of the text is indicated by an end mark “
”.
10. After inputting all your data, press A to store it into memory. At this time a cursor
appears on the new data display, ready for input. Press A again to return to the
normal timekeeping.
• The message “
” appears on the display and stays there while data is being
stored into chronological order.
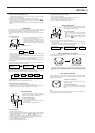
• The following shows how the display automatically changes if you do not operate
any button for a few minutes while in the Schedule Memo Mode.
Timekeeping
Mode
A few
minutes
Data input display
(Flashing)
Normal Schedule Memo
(No flashing)
A few
minutes
About Schedule Memo Mode memory management
• The Schedule Memo Mode shares memory with the Telememo Mode. This means
that the maximum number of Schedule Memo Mode entries you can store is reduced
each time you store data in the Telememo Mode.
• Schedule Memo Mode data items are automatically sorted into chronological order.
When the current (Timekeeping Mode) date changes at midnight each day, Schedule
Memo items with dates before the new date are automatically deleted.
• You can also manually delete Schedule Memo items normally using the procedure
under “To delete a specific Schedule Memo data”.
About Schedule Memo alarm
An alarm sounds when the date and time of an appointment are reached. A Schedule
Memo alarm sounds for about 20 seconds or until you press any button.
• The Schedule Memo alarm sounds and its message is displayed only if the watch is
in the Timekeeping Mode when the applicable date and time are reached. In other
modes, only the alarm sounds, without any display of the message.
• The alarm does not sound if you are inputting data or changing the time setting in
the Timekeeping Mode or Schedule Memo Mode, even when a Schedule Memo
alarm time is reached.
• While a Schedule Memo alarm is sounding, the appointment’s date, time and icon
appear on the display, even if the analog display (which normally does not have a
digital display) is being used in the Timekeeping Mode.
About the Schedule Memo signal
If the Hourly Time Signal (see “Alarm Mode”) is switched on, a signal beeps every
hour on the hour in the Timekeeping Mode during days when Schedule Memo items
are registered. Also, the time of the next Schedule Memo item appears on the display
for about 20 seconds.
• You can input a Schedule Memo item for a birthday or any other annual event by
inputting the date only (no time entry). When such an item is input and the Hourly
Time Signal is also switched on, a signal sounds every hour on the hour and the
reminder message appears on the display for about 20 seconds.
• The signals mentioned above use a different sound from the Hourly Time Signal.
To scroll through Schedule Memo data
In the normal Schedule Memo Mode (when no digit or cursor is flashing), press B or D
to scroll through the stored data items. Holding down either button scrolls at high
speed.
To edit Schedule Memo data
1. In the Schedule Memo Mode, use B or D to scroll through the data items and
display the one you want to edit.
2. Hold down A until the month digits begin to flash. The month digits flash because
they are selected.
3. Use C to move the flashing to the part of the Schedule Memo item you want to
change, and then use B or D to change it.
• For details on inputting data, see steps 4 through 9 in “To input Schedule Memo
data”.
4. Press A to exit the data input operation and to return to the normal Schedule Memo
Mode.
2. In the Telememo Mode, press B or D until the
new data display appears.
• If the message “
” appears on the display, it
means that memory is full. To store more data,
you first have to delete some of the data. Use the
procedure in “To delete a Telememo item” or in
“To delete a specific Schedule Memo item” to
delete data.
3. Hold down A until the flashing cursor appears on
the display.
1353/1361-2