


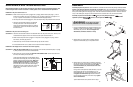


HOW TO LOWER THE TREADMILL FOR USE
1. Hold the upper end of the treadmill with your right hand as
shown. Using your left hand, slide the latch pin to the right.
Lock the pin in place by pressing the end of the pin into the
slot in the storage latch as shown in the inset drawing.
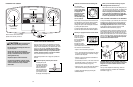
2. Hold the treadmill firmly with both hands, and lower the
treadmill to the floor. To decrease the possibility of in-
jury, bend your legs and keep your back straight.
41
55
5
6
Latch
Pin
Slot
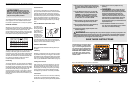
Batteries
8
6
7
7. The console requires two 1.5 V batteries (included).
Alkaline batteries are recommended. To install batteries,
first touch the Handrail (6) to discharge any static.
Next, open the Battery Cover (8). Press the batteries into
the battery compartment, with the negative (–) ends of
the batteries touching the springs. Close the battery
cover, push up on the tab, and then push the tab forward
as shown in the inset drawing. Be sure that the tab locks
into place.
6. Make sure that the Latch Pin (69) is in the Storage Latch
(41) as shown.
Attach the Storage Latch (41) to the Frame (55) with the
three Screws (5). Do not fully tighten the Screws yet.
Position the Storage Latch so that the Latch Pin (69) is
aligned with the hole in the Left Handrail (7). Slide the
Latch Pin into the hole as shown in the inset drawing.
Then, tighten the three Screws.
5
5. CAUTION: You must be able to safely lift 20 kg (45
lbs.) in order to do this step.
Hold the treadmill with your hands in the locations
shown. CAUTION: To decrease the possibility of in-
jury, bend your legs and keep your back straight. As
you raise the treadmill, make sure to lift with your
legs rather than your back. Raise the treadmill to the
vertical position.
8. Make sure that all parts are tightened before you use the treadmill. Keep the included allen wrench in a
secure place. The allen wrench is used to adjust the walking belt (see page 13). To protect the floor or carpet,
place a mat under the treadmill.
41
Hole
69
7
Tab
9
4
1
6
7
4. Loosen the two Console Bolts (9) underneath the
Console (1), and rotate the Console to the position
shown. Push the Right and Left Handrails (6, 7) inward
whilst you tighten the two Console Bolts.
6 11
69
7
8