


54
GETTING STARTED
Installing Batteries
This device operates on two AA batteries. To install, unscrew the battery
compartment cover located on the bottom of the unit. Insert the batteries
into the battery compartment so that the (+) and negative (-) terminals of
the batteries match the markings inside the compartment. Replace the
battery cover carefully – do not over tighten.
Use and Testing
This device operates on two AA batteries. Make sure they have been
installed according to the instructions above.
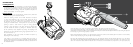
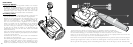
Attach the receiving antenna of the DSAS directional microphone
(1) and insert headphone plug into the audio output jack (2). If
you wish to test your night vision device in a lighted area, be sure
the objective lens cap is covering the objective lens (3) prior to
pressing the “POWER” button. The objective lens cap has a pinhole
opening to admit a small amount of light for testing purposes.
If testing or using the device in the dark, remove the objective lens
cap and activate the device by pushing the “POWER” button (4).
Set the preliminary focus adjustment by placing the adjusting mark
(located on top of the objective focusing ring) opposite the letter “N” in
the word “Normal”(11).
Place headphone in ears and activate the DSAS microphone by
depressing the “ON” button (6).
If the subject is to be viewed in a completely dark area where no
ambient light source (such as moonlight) is available, activate the Infrared
Illuminator by pressing the Infrared Illuminator button (5) located next to
the “POWER” button.
Infrared
Power
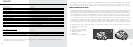
Direct the device at an object at a distance approximately 100 yards and rotate the eyepiece
(7) to give the best quality image. After the adjusting, do not rotate the eyepiece any longer irrespective
of the distance and other conditions. Direct the device at the subject to be viewed and adjust the final focus by rotating the objective
lens focusing ring until the image quality is optimal.
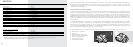
Adjust sound amplification volume to an optimal level by pressing the volume control buttons (8). If the sound is to be recorded,
insert the tape recorder plug into the jack (9) and start recording.
The Green LED indicates that the light amplifier unit is on. The Red LED indicates that the Infrared Illuminator is on. The Yellow
LED indicates that the DIRECTIONAL SOUND AMPLIFICATION SYSTEM is operating. Always remember to turn off the unit when
done. Do not store this device while the indicators are lit.
This device can be mounted on any tripod with a 1/4“ tripod socket (10).