


14
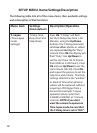
start time determines when time lapse mode recording begins
each day. The hour setting is based on a 24-hour clock, with “00”
hours = midnight, “12” hours = noon, “23” hrs = 11PM, etc. Press Ok,
then set the Duty start minute. After setting the minute, press Ok
to save the start time.
5. Next, set the Duty stop hour (24-hr format), using the Up/Down
buttons. The Duty stop time determines when time lapse mode
recording ends each day. Press Ok, then set the Duty stop minute.
After setting the minute, press Ok to save the stop time. The Setup
Menu moves to “Set Date”. Press the Setup button to exit the menu.
The camera will now operate in time lapse mode, based on the
settings you’ve made.
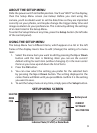
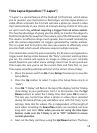
Here’s an example of how the camera would operate, based on the
following T- Lapse settings:
T-Delay: 15M
Duty start time: 16:00
Duty stop time: 18:30
These settings would cause the camera to take a photo (or video,
depending on which you have it set for) beginning at 4 PM, then another
one at 4:15, 4:30, etc.–one every 15 minutes, until the Time Lapse
recording stops at 6:30 PM. The next day, the camera would again record
an image or video once every 15 minutes between 4 PM and 6:30 PM.
Remember, this is independent of normal triggers due to animal activity–
even if no animals enter the IR sensor coverage zone, an image or video
will still be captured every 15 minutes during the 2.5 hour block of time.
T-Delay Duty (Start)
Duty (Stop)
How often photos or
videos will be taken
(during Duty cycle)
Time Lapse operation
begins (daily)
Time Lapse operation
ends (daily)