


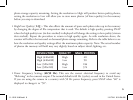


7. You may now name the group of photos if you wish (#2), or accept the default “Captured (current
date). Note that your photos will also be added to your hard drive in a folder of the same name,
located in C:/My Documents/My Pictures.
8. Click the “Transfer Photos” button (#3).
9. After several seconds, the driver screen will appear. Click on the “Download photos” button (pink
camera round icon on bottom left) to start the download from the ImageView to your computer.
10. When the download is finished, you should see “thumbnail” preview frames showing your photos
in the driver window.
11. Next, click the second button from the right at the bottom of the driver window, to “select all
photos in this page”, if you want to transfer all the photos to your PC. Or, click on the thumbnail
frames to select just the photos you want to work with (click again to deselect one), then click
“Transfer photos” (second button from left) at the bottom of the driver window. You are then
returned to the PhotoSuite transfer screen, and should see all of your transferred photos, identified
by the date and file number (beginning with 00000).
12. Click “Next”, then “Done” at the bottom of the left frame area.
You may now wish to edit (click Edit & Create, then Edit), or print (click Print & Share, then Print)
your photos. For detailed instructions for using these and other PhotoSuite features, please refer to
“Roxio PhotoSuite Help”, available by selecting the Help menu at the top of your screen. When you
have finished transferring and working with your photos, you may disconnect the camera from the
USB cable. After your photos have been successfully transferred to your PC, you may clear the previous
contents from the camera’s memory (see “Delete All Images” under “Changing Operational Modes”),
and begin taking new photos.
9
11-1210 1LIM.indd 13 11/17/04 9:31:29 AM