


6 BURLEY TRAILER OWNER’S INSTRUCTION AND SAFETY MANUAL
BURLEY TRAILER OWNER’S INSTRUCTION AND SAFETY MANUAL 7
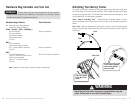
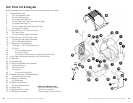
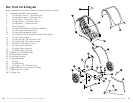
Hardware Bag Contents and Tool List
Hardware Bag Contents: Tools Required:
All: Warranty Card, Burley Owner’s
Instruction & Safety Manual
d’Lite
™
, Encore
™
, Solo
™
, Lady Bug
™
:
(2) red reflectors Phillips screwdriver
(2) clear reflectors
(2) reflector brackets
(4) hex head screws
(1) hitch
Bee
™
:
(2) red reflectors
(2) hex head reflector screws
(2) 1” plastic reflector brackets Phillips screwdriver
(1) hitch
Cub
™
:
(1) Cub Brake Assembly Two No. 2 Phillips screwdrivers
(3) #10 x 5/8 Phillips pan screws
(3) #10 spring washers
(3) #10 x 1” fender washers
(1) hitch
Note: European models have an additional light hardware bag.
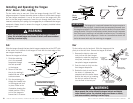
Unfolding Your Burley Trailer
To unfold your trailer, rotate the front tube upward and the rear tube back
until they meet on the two plastic saddles. Then rotate the two frame locks
to snap onto the rear tube. The frame locks should connect adjacent to, and
to the outside of, the two plastic saddles.
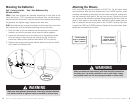
d’Lite
™
, Encore
™
, Lady Bug
™
, Cub
™
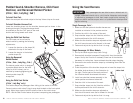
– After the frame locks are locked in place,
attach the hooks on the seat sides to the D-rings by the windows inside the
trailer.
Solo
™
only – After the frame locks are locked in place, clip the female buckle
ends on the two seat side straps into the male buckle ends on the inside of
the frame.
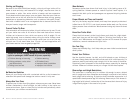
Check that the frame locks are properly engaged before using the
trailer. Failure to do so can result in serious injury.
WARNING
Please verify that you have received all of the contents
listed. Do not proceed with assembly if any parts are missing; contact
Burley immediately for replacement parts.
IMPORTANT:
Frame locks snapped
into closed position
onto rear tube.
Rear
Front
Seat clips attach
to the top of the
frame.
Seat clips