


Basic Assembly Principles
Here are few basic assembly tips that can make assembly of your Bowflex
® 3, 5, and 7 Series treadmill quick and easy.
1. You can make the assembly process go faster by gathering the pieces you need for each step prior to starting the step.
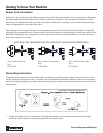
2. As a general rule, and for all fasteners on your Bowflex
® 3, 5, and 7 Series treadmill, turning toward the right will tighten, turning
towards the left will loosen. An easy way to remember this is by remembering the expression, “Lefty loosey, righty tighty.”
3. The Allen wrenches and Phillips screwdriver tools needed to assemble your Bowflex
® 3, 5, and 7 Series treadmill
are provided.
You
may find the use of a utility knife or scissors beneficial during the unpacking process.
4. It is recommended that you use two people to assemble your Bowflex
® 3, 5, and 7 Series treadmill
.
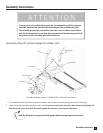
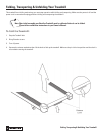
Select Your Workout Area
Select where you are going to put your
Bowflex
® 3, 5, and 7 Series treadmill carefully. The best place for your treadmill is on a hard,
level surface. You will need at least 20 inches (.5 meters) on each side of the treadmill and 79 inches (2 meters) behind your treadmill for
dismount.
Make sure that the location you choose has a grounded, 3-prong power outlet within reach of the treadmill power cord, and you have
the appropriate power cord for the outlet.
NOTE: The Bowflex
® 3, 5, and 7 Series treadmill
is designed to plug into a grounded, non-GFI outlets only. To determine if your outlet
or circuit breaker is GFI, look for a test and reset button on them. If they have the test and reset button it is a GFI outlet or
circuit breaker.
Further, if you ever perform any repairs on your treadmill that require you to lay it on its side, you will need at least five feet to one side
of your workout area.
3
Fitness Safeguards and Warnings