


These instructions explain the steps to remove an existing crankset and install
a new one. The correct installation of a new Bontrager crankset is critical to the
rider's safety, so this work should be performed only by an experienced mechanic
with the proper tools. If you are not sure of your ability to correctly install this
crankset, have the crankset installed by your Bontrager dealer.
When installing a threaded part, apply a small amount of bicycle grease to the
threads, except for aluminum chainring bolts. With aluminum chainring bolts,
apply a drop of Loctite 222 to the threads.
The crankset interfaces with the frame, bottom bracket, chain, front derailleur,
and front shifter. These parts must be compatible and the correct sizes and
designs to function correctly. If you are not sure if this crankset is compatible
with your bicycle, consult your dealer.
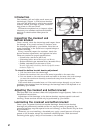
Note: There are right and left pedals, usually marked with a letter stamped on the
end of the pedal axle, or on the wrench flats.
1. Turn the right pedal spindle counter-clockwise to remove the right pedal.
2. Turn the left pedal axle clockwise to remove the pedal.
1. Lubricate the threads.
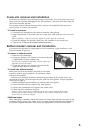
2. Place the pedal washer (Figure 4) over the pedal
threads.
3. Thread the pedal into the crank arm by hand.
4. Tighten the pedals as in Inspect the crankset and
bottom bracket.
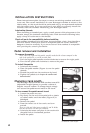
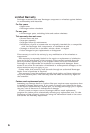
The Bontrager Race XXX Lite ATB crankset uses ALS
(Adjustable Length System) to provide a choice of
lengths: 170 and 175mm. To change length, simply
turn around the pedal-mount insert in the crank.
1. Loosen the pedal one turn.
2. Tap firmly on the end of the pedal with a plastic
or rubber mallet until the insert (Figure 4) is
dislodged.
3. Remove the pedal.
4. Press the insert out of the crank, and turn
around.
There is a left and right insert, marked L and R. Make
sure the left insert is in the left crankarm.
5. Lubricate the insert and place in the crank with
the pedal hole in the desired position.
6. Install the pedal.
Figure 4- Position of ALS system
for different crank lengths
170mm
175mm
Figure 4- ALS parts
Pedal
washer
Insert