3
POWER SUPPLY
The unit is powered by 9 “C” alkaline dry cell batteries (not supplied).
Press the button on the bottom of the Lantern to eject the pack. Turn the knob (counterclockwise) on the front
of the Removable Dry Cell Battery Pack to open. Insert the batteries observing the cautions that follow.
Note: Use only “C” alkaline dry cell batteries in this unit.
CAUTIONS
• When replacing the “C” alkaline dry cell batteries: DO NOT mix old and new batteries. Always insert batteries
correctly with regard to polarity (+ and –), marked on the battery and the equipment. Remove dead batteries
immediately and dispose of per local codes.
• DO NOT dispose of batteries in fire, as this may result in an explosion.
• Keep batteries out of the reach of children.
OPERATING THE LANTERN
The Lantern is controlled by the Lantern ON/OFF Switch on the front of the unit (see the “Control and Function
Guide”).
OPERATING THE 6 LED AUXILIARY LIGHT
The 6 LED Auxiliary Light in the lantern base is controlled by the LED Light ON/OFF Pushbutton on the front of
the unit. (See the “Control and Function Guide.”)
CARE AND MAINTENANCE
Cleaning
Over time, dust or fingerprints may accummulate on the Lantern glass. Clean with a soft, clean, oil-free cloth
moistened with household window cleaner. Do not use alcohol based cleaners on plastic surfaces. This will
eventually cause surface clouding.
Note: Never submerge this unit in water or any other liquid.
Replacement Parts
Check unit periodically and discontinue use if parts or accessories are found to be damaged or defective. To
replace worn or defective parts, contact Customer Service toll-free at 1-800-544-6986.
Bulb Replacement
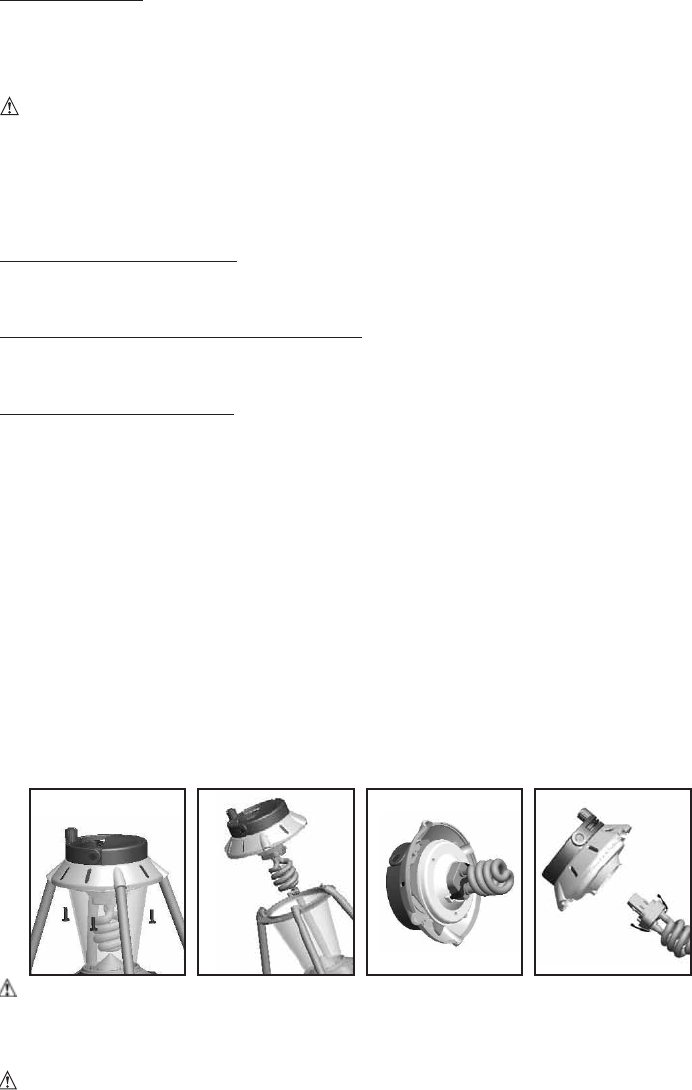
1. Unscrew the top of the Lantern (refer to Figure 1 below).
2. Remove the bulb assembly (refer to Figure 2 below).
3. Locate the metal spring in the top of the lamp (refer to Figure 3 below).
4. Grasp the metal spring and the lamp base to remove the bulb (refer to Figure 4 below).
5. Replace the bulb with a new 9 watt CFL bulb and re-assemble.
WARNINGS
DO NOT operate any of the unit’s features unless the unit is fully assembled.
NEVER attempt to operate the Lantern without both the bulb and housing in place; and only replace the bulb
with a new 9 watt CFL bulb.
CAUTIONS: TO REDUCE THE RISK OF INJURY OR PROPERTY DAMAGE: NEVER grasp the glass bulb
directly. It can shatter. DO NOT TWIST to remove the bulb; it pulls straight out of the socket.
FIGURE 1
FIGURE 2 FIGURE 3 FIGURE 4
WLL1B_ManualEN_050307.qxp 6/6/07 5:10 PM Page 3


