


3
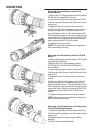
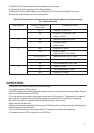
MOUNTING
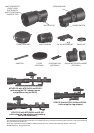
Mounting onto the Weaver rail with 7/8”
Weaver Mount
1) Mount the 7/8” Weaver Mount onto the body of
PS-22 with 2 screws M4x7 from set.
2) Unscrew the protective back cap from PS-22.
3) Screw the Light Screen into the thread in back
side of unit.
4) Slightly loosen the fixing screws of mount.
5) Place the PS-22 on the weaver rail of the fire
arm before objective of daytime scope on the
minimal distance from it. The optical axes of PS-
22 and daytime scope must have divergence not
more than 3mm. High of optical axe of the PS-22
under weaver rail is 40mm with standard mount
and corresponded ATN 3.5x26 scope.
6) Tighten the fixing screws.
NOTE: Fixing screws may need to be tightened
after continuous shooting.
Mounting onto the Weaver rail with A.R.M.S.
Mount
1) Mount the Adapter onto the body of PS-22 with
2 screws M4x7 from set.
2) Mount the PS-22 with Adapter onto the
A.R.M.S.#10 or A.R.M.S.#19 ACOG with 2
screws M5x8.
3) Unscrew the protective back cap from PS-22.
4) Screw the Light Screen into the thread in back
side of unit.
5) Slightly loosen the fixing screws or levers of
mount.
6) Place the PS-22 on the weaver rail of the fire
arm before objective of daytime scope on the
minimal distance from it. The optical axes of PS-
22 and daytime scope must have divergence not
more than 3mm. High of optical axe of the PS-22
under weaver rail is 49mm with A.R.M.S.#19
ACOG.
7) Tighten the fixing screws or levers of mount.
NOTE: Fixing screws may need to be tightened
after continuous shooting.
Mounting onto the objective of the day scope
with Optional Ring Adapters
1) Unscrew the protective back cap from PS-22.
2) Screw the Ring Adapter into the thread in back
side of unit.
3) Slightly loosen the fixing screws of Ring
Adapter.
4) Put the Insert into the Adapter