


44
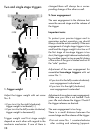
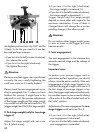
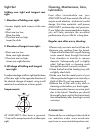
6. Adjustment of the trigger blade
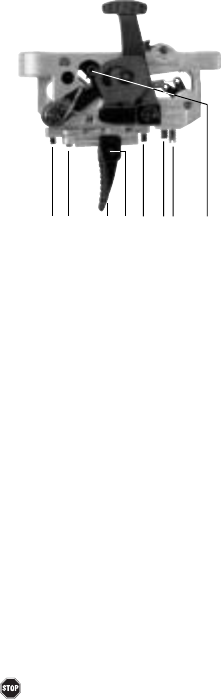
•Loosen hex screw No. 7
•Trigger blade No. 6 can be moved in the
longitudinal guide and can be tilted
laterally.
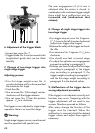
7. Change of two-stage trigger into
single stage trigger
Adjusting process:
•Turn first stage weight screw No. 4
counter-clockwise until you have reached
the maximum first stage.
•Cock the rifle.
•Turn set screw No. 5 (first stage) counter-
clockwise until the triggerreleases.
•Turn set screw No. 5 from this position
approx.
1
/
4
turn clockwise.
The trigger is now adjusted to single stage
operation, there is no more first stage.
Warning:
Single stage triggers are very sensitive and
must be operated with special care.
The sear engagement of
5
/
100
mm is
obtained after the action is closed. In
combination with a minimum trigger weight
there might be a malfunction and an
increased risk (inadvertent shot
release).
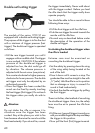
8. Change of single stage trigger into
two-stage trigger
•Turn trigger stop set screw No. 8 approx.
2
1
/
2
turns to the left (counter-clockwise)
(adjust max. trigger stop longer).
•Release the safety of the trigger and cock
the rifle.
•Turn set screw No. 5 approx. 2
1
/
2
turns
clockwise.
•You should now feel a second stage
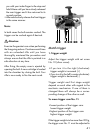
•To adjust the optimum sear engagement
proceed according to paragraph 3.
•Perhaps you have to adjust the first stage
according to paragraph 4, the trigger
stop according to paragraph 5, the
trigger weight according to paragraph 1
and the first stage weight according to
paragraph 2 to the desired values.
9. Malfunctions of the trigger due to
wrong adjustment procedure
If the trigger is not adjusted correctly mal-
functions may occur. Tampering with the
trigger adjustments will not result in any
success. Therefore proceed as follows:
After every change the function of the
trigger must be checked. When the
malfunction is removed check the desired
trigger values and adjust them again if
necessary.
i
uo
pasd f