


The information in this manual furnished for information use only, is subject to change without notice, is not to be
construed as a commitment by ATN Corp.
ATN Corp. assumes no responsibility or liability for any errors or inaccuracies that may appear in this book.
©2002 ATN Corp. All right reserved.
2
APPLICATION
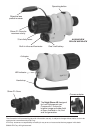
The Night Storm Night Vision Monocular is a complex opticoeiectronic system for individual
use. The device consists of the objective lens assembly, eyepiece and the body. The body
contains an image intensifier tube assembly with an integrated high voltage power source and
the three volt battery housing. When installing the battery one should keep in mind that the
polarity of the battery should coincide with the diagram on the body next to the battery housing
cap.
Objective lens protective cover is intended to protect the objective lens from dust and
scratches. It also will act as a daylight filter, allowing you to test the scope in daylight or other
bright light situations. The pinhole in the center of the protective cover allows the user to check
the operation ability of the device in daylight conditions.
NOTE: Do not test the scope in daylight conditions even with the daylight filter/lens cap on for
more than ten (10) minutes.
OPERATION
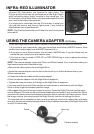
• Take the monocular out of the case.
• Install the battery into the housing with the polarity order as shown on the scope. Battery
Type: 3 Volt Lithium, #CR123A .
• The Night Storm has a single switch button operation.
1 GEN. MODEL:
• Press the button to turn the unit on with the protective lens cover still attached to the lens. The
Infra-Red Illuminator will also automatically turn on. The green LED indicator represents the
light intensifier tube and the IR Illuminator power.
• Press the button again to turn the unit off.
2 GEN. AND 3 GEN. MODELS:
• Press the button to turn the unit on with the protective lens cover still attached to the lens.
The green LED indicator represents the light intensifier tube power.
• Press the button again to turn the Infra-Red Illuminator on. The red LED indicator will light up
instead of the green.
• Press the button for the third time to turn the unit off. The IR automatically will turn off also.
• Do not turn the unit on in the daytime without the protective lens cap on.
NOTE: You should see green glow in the eyepiece. You may notice a persistent green glow
for up to five (5) minutes after you have turned the unit off. This is normal for the 1st Gen Light
intensifier tube.
• Observe the scene and adjust the diopter for optimal image clarity. Focus the front lens until
the image and the grain are both sharp.
• You may now enter a dark environment or simply shut the lights off in order to darken the
room.
• Next, remove the lens cap/daylight filter. Adjust the front lens for distance of the focus. You
should not have to readjust the diopter.
• The front lens should be readjusted as you view objects at different distances.
NOTE: We suggest that you focus the diopter during daylight with the filter on.