


10
8
11
9
12
13
1514
SETTING PROCEDURE
ACCUSPLIT products use a common setting procedure
known as “S1- S2-S3-S4.” Here’s how it works:
Press S1 for 2 seconds: Enter the SET mode
Press S2: Change the field to be set
Press S3: Change the field value
Press S4 for 2 seconds: Exit the SET mode
You can enter and exit Set mode from any of the regular
display screens. Once in Set mode, you can cycle through all
of these settings by pressing S2 repeatedly:
Set Stride Length g Set Clock Hours g Set Clock Minutes
We recommend that you adjust the settings all at once, using
the procedure below.
Entering set mode
Press and hold the S1 button for 2 seconds.
The display will start to flash, showing that you’ve entered
SET mode.
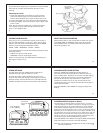
Setting Stride Length
1. Press S2, repeatedly until the mode indicator bar is
underneath DIST and the “in” indicator comes on.
The display will show a flashing number, which is your
Stride Length set point (in inches).
2. Press the S3 + (MODE) button to increase the Stride
Length (in increments of ¼ inch), and press the S3-
(RESET) button to decrease the Stride Length. Hold
the buttons down to change values quickly.
3. Press the S2 button to adjust the clock.
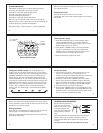
Finding Your Stride Length: Your stride length is the
length of one of your steps, measured from “toe to toe.” To
measure, walk 10 steps with your normal stride and measure
the TOTAL DISTANCE from the toe of your starting step to
the toe of your 10th step (see diagram below). Divide the
TOTAL DISTANCE by 10, and multiply the decimal portion by
12 to find your stride length in feet and inches. Example: You
walk 23 feet and 6½ inches in 10 steps. Convert to feet only =
23.542 feet (6½ ÷ 12 = 0.542). Divide by ten to get the stride
length in feet = 2.354 feet. Now, convert back to feet and
inches to get your stride length = 2 feet 4.25 inches (0.354 ×
12 = 4.25).
10 steps
Setting the Clock
1. (Continuing from above) - After pressing S2, you will
see the “lb” indicator go out, and the “A” or “P”
indicator come on. The display will show the current time
of day setting, with the Hours value flashing.
2. As before, press the S3 + (MODE) button to increase
Hours, and press the S3 - (RESET) button to decrease
Hours. Hold the buttons down to change values quickly.
Note: the “A” and “P” indicators indicate AM and PM.
3. Press the S2 button to adjust the Minutes.
4. Press the S3 + (MODE) button to increase Minutes, and
press the S3 - (RESET) button to decrease Minutes. Hold
the buttons down to change values quickly. Note: the “A”
and “P” indicators indicate AM and PM.
STEP TIME DIST
DIGI-WALKERXL.COM
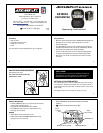
180
XL
S3- S3+S1,S2,S4
JW200
in
Setting Stride Length
Stride
Length
Flashes
“in” indicator
for inches
Note: If you need to go back and change some of the values,
simply press S2 to cycle through all of the set points until you
see the one you want to change.
Exiting Set Mode
Press and hold the S4 button for 2 seconds. The unit will exit
setting mode – no values will be flashing anymore.
Note: The unit will save any changes and exit set mode after
30 seconds unattended.
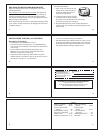
WEARING YOUR PEDOMETER
Gently slide the pedometer
onto your belt or the top
edge of your pants or skirt.
It should fit snugly and
level, above one knee. The
strong steel clip makes it
easy.
Note: The pedometer should be as vertical as possible.
Walkers with larger stomachs may find it helpful to
wear the pedometer farther back on the body, toward
one hip.
The cover must be closed for the pedometer to work.
yes
no