


5/2/06
SP3638IS01SPORA
1
2 3 4 5 6 7 8 9
10 11 12
14
15 16 17 18 19 20 21 22 23
© 2006 Sportline Inc.
Distributed by Sportline Inc.,
Hazleton, PA 18202
Distributed in UK by StarCase (UK) Ltd
Worcester, WR4 9FA
To learn more, log onto www.sportline.com
SP3638IS01SPORA
SOLO 920
HEART RATE WATCH
©2006 Sportline, Inc.
#3638
#3639
®
This equipment has been tested and found to comply with
the limits for a Class A digital device, pursuant to Part 15
of the FCC Rules. These limits are designed to provide
reasonable protection against harmful interference when
the equipment is operated in a commercial environment.
This equipment generates, uses, and can radiate radio
frequency energy and, if not installed and used in
accordance with the instruction manual, may cause
harmful interference to radio communications. Operation
of this equipment in a residential area is likely to cause
harmful interference in which case the user will be
required to correct the interference at their own expense.
Contents
• How to Measure Your Heart Rate
• Helpful Hints in Measuring Heart Rate
• Features and Button Operation Overview
• Setting the Time and Date
• Setting the Daily Alarm
• Turning the Daily Alarm ON/OFF
• Turning the Hourly Chime ON/OFF
• About the Heart Rate Target Zone and Alert
• Setting the Standard Heart Rate Target Zone
• Setting Manually Your Personal Heart Rate Target Zone
• Setting the Heart Rate Alert ON/OFF
• Using the Chronograph Feature
• Using the Countdown Timer Feature
• Using the Calorie Feature
• Setting Dual Time
• Care and Maintenance
• Specifications/Battery
• How the Heart Rate Monitor Watch Works
• Contact Information
• Warranty
• Disclaimer
Congratulations on your purchase of this Sportline Solo 920
Heart Rate Watch.
We commend your efforts on taking steps for healthier living.
Measuring your heart rate is fun and easy, and can help
manage your ‘heart health’.
While the Sportline Solo 920 Heart Rate watch works like a
standard sports watch, it includes an advanced heart rate
sensing technology - S-Pulse™ - that provides easy and
accurate contact heart rate readings.
S-Pulse™ is a patented heart rate sensing technology that
measures the electrical signals on your skin – in the same
manner that an EKG or electrocardiogram does.
While the Sportline Solo 920 Heart Rate watch attaches to your
wrist like other watch products, it does not measure or sense
your pulse at your wrist. It instead uses S-Pulse™ technology
to sense your heart rate by measuring your EKG signal.
How to Measure Your Heart Rate
To get your heart rate reading, just follow these simple steps:
1. Place the Sportline Solo 920 Heart Rate Watch on your wrist,
adjusting for a snug, comfortable fit.
2. Place your finger on the Sportline Solo 920
Heart Rate Watch’s sensor, as shown,
and press gently for 3-8 seconds.
Be sure to activate the Heart Rate
mode by pressing the bottom metal
sensor so that the display flashes. It
is best to use the flat ‘pads’ of
your fingers, and not the
fingertips.
3. A ‘beep’ will sound and your heart rate will be
displayed. It’s that easy!
Because the Sportline Solo 920 Heart Rate Watch is a sensitive
monitoring device that reads your EKG signals, reading times
will vary. If you don’t get a reading in 3-8 seconds, wait a
couple of minutes and try again. This gives the Sportline Solo
920 Heart Rate Watch a chance to settle in and pick up your
electrical signals.
Your heart rate will remain displayed once measured,
and will remain displayed for 7 seconds after you release
the sensor button.
• The Sportline Solo 920 Heart Rate Watch must be attached
to your wrist in order for the Heart Rate Measure function
to work.
• Proper finger pad contact is very important and affects the
heart rate reading time.
• For those users with dry skin, thick or calloused fingers,
low heart rate signal strength (EKG strength), minimal
padding on your fingers, or users located in dry
environments, please see our Helpful Hints section.
• The Heart Rate Measure function is not intended for use or
operation in or under water.
Helpful Hints in Measuring Heart Rate
If you are having difficulty measuring your heart rate, you may
want to try the following steps. Try each of these in order until
you successfully measure your heart rate:
1. Make sure the Sportline Solo 920 Heart Rate Watch is
snugly strapped to your wrist. A loose fit makes it more
difficult to properly measure your heart rate. Stop if OK or
2. Press gently with enough pressure to activate the heart rate
measure mode. Muscle ‘noise’ from pressing too hard can
make it difficult to measure your heart rate. Stop if OK or
3. Make sure that the metal back of the Heart Rate Watch is
laying flat on your skin. Stop if OK or
4. Make sure your wrist and fingers are clean and free from
dirt, oils, or lotions. Stop if OK or
5. Stay still, and relax your arms on a stable surface while
taking your heart rate. Stop if OK or
6. Clean the front sensor and back metal plate with a mild
soap and water or similar cleaning solution.
7. Moisten with water the pads of the fingers that you are
using to contact the sensors on the face of the watch.
Stop if OK or
8. Moisten with water the surface between the back metal
plate of the watch and the skin on your wrist.
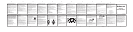
Sportline Solo 920 Heart Rate Watch Features and Button
Operation Overview
1. Press the MODE button to select the desired feature mode.
The Heart Rate Watch feature modes (displays) are:
• Time
- Set time, date, 12H/24H display mode, and Button
Beep ON/OFF.
• Heart Rate Target Zone
- Enter Age and Gender to set high/low target limits
automatically
- Or manually enter your own target limits
• Alarm
- Set alarm time, turn alarm ON/OFF, turn hourly chime
ON/OFF
• Chronograph
- Run chronograph
• Countdown Timer
- Set/run timer countdown
• Calorie
- Set the Calorie display
• Dual Time
- Set Hour display only.
2. Once you have selected a feature mode, to change a setting
in that mode, hold the MODE button down for 2-3 seconds
until the display flashes.
• When in ‘Button Beep ON’ mode (watch default), the
Sportline Solo 920 will beep when the buttons are
pushed.
3. Once flashing, to set a feature use the ST/STP button to
increase and RESET button to decrease the setting.
4. To move to the next setting, press and release the MODE
button.
5. To save new settings after completion, hold the MODE
button down for 2-3 seconds until the display stops flashing.
Setting Time and Date
1. While in the Time mode hold the MODE button down for
2-3 seconds until the display flashes.
2. The ‘seconds’ display will flash. In order, the settings to
enter will be:
-seconds
-minutes
-hours
-year
-month
-day
-Month-day then appear flashing
-12Hr (am/pm) or 24Hr (military) time mode
-Button Beep ON or OFF (buttons beep when pressed when
ON, no beeping when OFF)
3. To set the feature, press the ST/STP button to increase and
RESET button to decrease the setting.
4. To move to the next setting, press and release the MODE
button.
5. After all settings are entered, to save the new settings, hold
the MODE button down for 2-3 seconds until the display
stops flashing.
•Calendar display: To display the calendar once set, simply
press and release the ST/STP button while in standard
time mode. Press and release the ST/STP button to return
to the Time mode.
Setting the Daily Alarm Time
1. While in the Alarm mode, hold the MODE button down for
2-3 seconds until the ‘hour’ display flashes.
2. To set ‘hour’, press the ST/STP button to increase and RESET
button to decrease the setting.
3. To move to ‘minutes’, press and release the MODE button.
4. After ‘hours’ and ‘minutes’ are set, to save, hold the MODE
button down for 2-3 seconds until the display stops flashing.
Turning the Daily Alarm ON/OFF
Daily Alarm Indicator
1. While in the Alarm mode, press the ST/STP button once to
turn the Daily Alarm ON or OFF.
2. When the Daily Alarm Indicator appears, the daily alarm is
ON. The Watch will start beeping at the designated alarm
time for 30 seconds. To stop the beeping early, simply press
any button (except the LIGHT button).
Turning the Hourly Chime ON/OFF
Hourly Chime Indicator
1. While in the Alarm mode, press the RESET button once to
set the hourly chime ON or OFF.
2. When the Hourly Chime Indicator appears, the hourly chime
is ON, and the Watch will beep at the top of each hour.
About the Heart Rate Target Zone and Alert
The Heart Rate Target Zone feature helps you compare your
acquired heart rate with your target zone when the Heart Rate
Alert feature is ON:
• If your heart rate is within the target zone, the Watch
will beep once and display your heart rate.
• If your heart rate is lower than your target zone lower
limit, the Watch will beep twice and your heart rate will be
displayed with an “L” (L = Low).
• If your heart rate is higher than your target zone upper
limit, the Watch will be beep twice and your heart rate will
be displayed with an “H” (H = High).
Example: Debbie’s target zone is 80-120 bpm (beats per min.).
After 5 minutes of walking, Debbie measures her heart rate.
Debbie’s heart rate is: “L 72”. She can decide to pick up her
pace so her next reading falls within her target range, or she can
stay at her current pace.
Setting the Standard Heart Rate Zone
Note: If you are new to exercise, have a heart condition, or
have questions/concerns about your heart and heart rate zone,
please consult your doctor.
By entering your age and gender, the Watch will calculate your
standard heart rate range.
1. While in the Heart Rate Target Zone mode, press the MODE
button for 2-3 seconds until the display flashes.
2. To enter your age, press the ST/STP button to increase and
RESET button to decrease the setting.
3. After your age is entered, press the MODE button to select
your gender. Press the ST/STP or RESET button to select
“M” for male or “F” for female.
4. After your age and gender are entered, hold the MODE
button down for 2-3 seconds until the display stops flashing.
The settings are now saved.
Setting Manually Your Personal Heart Rate Target Zone
You can manually override the standard heart rate settings of
the watch, if desired, to settings of your own preference.
1. When in the Heart Rate Target Zone mode, hold the MODE
button down for 2-3 seconds until the display flashes.
2. Set or confirm your age and gender (previous section), then
press and release the MODE button.
3. Your standard high upper limit, designated with an “H”, will
be flashing. This can be adjusted up or down by pressing
the ST/STP button to increase and RESET button to decrease
the setting.
4. Press the MODE button. Your standard lower limit,
designated with an “L”, will be flashing. This can be
adjusted up or down by pressing the ST/STP button to
increase and RESET button to decrease the setting.
5. To save your settings, hold the MODE button down for 2-3
seconds until the display stops flashing.
Setting the Heart Rate Alert Feature ON/OFF
When in the Heart Rate Target Zone mode, to turn the Heart
Rate Alert Function ON or OFF, press the ST/STP button.
• When OFF, your upper and lower limits will be ‘hidden’ by
the display, and your Heart Rate Alert function will now be
OFF. However, your upper and lower limits are still retained
in the Watch memory.
• When ON, your upper and lower limits will now appear in
the display, and your Heart Rate Alert function will now be ON.
Relative Heart Rate
Relative Heart Rate is your current heart rate divided by your
maximum heart rate, and can be a useful reference to manage
how hard you are working during your exercise.
• Maximum Heart Rate is calculated as: 220 less your age
(220 – your age).
• Your Relative heart rate will be displayed as a percentage
when displaying your heart rate.
Example of Relative Heart Rate:
Tom is 30 years old.
His heart rate measured as: 132.
Maximum heart rate 220 – age 30 = 190 bpm.
132/190 = 70% is Toms relative heart rate.
Note: Relative heart rate will only be displayed if the Target Rate
Alert Feature is turned on when you measure your heart rate.
Using the Chronograph Feature
The Chronograph feature measures elapsed time from a zero
starting point. The maximum counting range of the
chronograph is 99 hours, 59 minutes and 59 seconds.
To use the Chronograph, press the MODE button to select the
Chronograph mode. The Watch can now be used to record an
elapsed length of time.
1. Press the RESET button to reset counter to ‘0’.
2. Press the ST/STP (start/stop) button once to start timing.
3. Press the ST/STP (start/stop) button to stop timing.
4. To reset the chronograph to '0' press the RESET button.
Using the Countdown Timer Feature
The Countdown Timer tracks a fixed period of time by counting
down from a user-set time period.
• The Watch is set at a 1 minute default.
The countdown time can be set up to 99 hours, 59 minutes and
59 seconds.
Setting the Countdown Timer
To use the Countdown Timer, press the MODE button to select
the Timer mode.
1. When in Countdown Timer mode, press the MODE button
down for 2-3 seconds until the 'hour' digit flashes.
2. To set ‘hour’, press the ST/STP button to increase and RESET
button to decrease the setting.
3. To move to ‘minutes’, press and release the MODE button.
4. To move to ‘seconds’, press and release the MODE button.
5. After ‘hours’, ‘minutes’, and ‘seconds’ are set, hold the
MODE button down for 2-3 seconds until the display stops
flashing. The settings are now saved.
Running the Countdown Timer
1. Once a countdown time has been set, press the ST/STP
button once to start the Timer.
2. The Timer will start counting from the countdown time down
to ‘0’.
3. At 5 seconds before finish, the Watch will start to beep. This
will continue for 15 seconds.
4. To stop the beeping early, press any button (except the LIGHT
button).
5. The Countdown Timer will then return to the original
countdown time.
• To reset the Countdown Timer to the original countdown
time, press the RESET button once when the Timer is
stopped.
• To reset the Timer while the Timer is running, press the
ST/STP button to stop the counting, then press the
RESET button.
Using the Calorie Feature
1. When in Time mode, press the MODE button 5 times until
you see the Calorie (CA) screen.
2. Press the ST/STP button to activate the Calorie timer.
3. Your calories are calculated based on your current heart rate
(user is recommended to acquire heart rate at least once
before starting the calorie timer).
4. Your calories burned will be displayed in the lower right corner.
5. Press ST/STP to stop the calorie timer.
6. When Calorie Timer is stopped, Press RESET to a new
calorie count.
Setting Dual Time
1. While in Time Mode, press the MODE button 6 times until
you reach the Dual time screen and hold for 2-3 seconds.
2. The ‘hour’ display will flash.
3. To set the hour, press the ST/STP button to increase and
RESET button to decrease the hour.
4. The ‘minute’ and ‘seconds’ will automatically copy over from
the regular time setting (as a result, minute and seconds
cannot be adjusted in dual time mode).
5. To save the setting, hold the MODE button for 2-3 seconds
until the display stops flashing.
Care and Maintenance
To ensure proper function of your Sportline Solo 920
Heart Rate Watch:
• Avoid rough usage or severe impacts to the Watch.
• Keep the front sensor and back metal plate free from dirt,
oils, or other contaminants.
• Periodically clean the Watch, using a soft cloth, with a mild
soap and water or similar cleaning solution.
• Keep the Watch out of extreme heat or cold.
• Do not expose the Watch to intense direct sunlight for long
periods of time.
• Do not expose the Watch to chemicals such as gasoline,
alcohol, or solvents.
Specifications
Current Time Mode
• Hour, minute and second
• Month, day, day of week and year
• 12 / 24 hour format selectable
• Month-day/Day-month selectable
• Auto calendar from year 2000 to 2099
• Hourly Chime on the hours
Heart Rate Alert Mode
• Measuring range: 43 to 200 beats per minute
• Heart Rate Alert (upper and lower limit)
Daily Alarm Mode
• Daily Alarm: 1 daily alarm
• Alarm Duration: 30 seconds
Chronograph Mode
• Resolution: 1/100 second
• Counting range: 99 hours, 59 minutes, 59 seconds
• Measuring mode: Elapsed time
Countdown Timer Mode
• Resolution: 1 second
• Limit: 99 hours, 59 minutes, 59 seconds
• Alarm sound: 1 beep at the 5,4,3,2 and 1 second(s),
3 beeps at 0 second for 10 seconds.
Dual Time
• Hour, minute and second
Calorie
• Calories burned
Other
• Electro-luminescent/EL backlight
• Water-resistant to 50 meters
The Heart Rate Measure function is not intended for use or
operation in or under water.
Battery
Battery replacement will be required from time to time, and
should occur when:
• The display fades in part or completely
• The Heart Rate function will not activate
To replace the battery of your Sportline Solo 920 Heart Rate
Watch, we recommend that this be done by a watch repair
service center. This will ensure that the water resistance will
be retained after battery replacement.
The watch uses standard lithium replacement batteries
as follows:
Large (#3639) size: 2032
Medium (#3638) size: 2025
NOTE
• Non-rechargeable batteries are not to be recharged
• Rechargeable batteries must be removed before recharging
• Rechargeable batteries only to be recharged under adult
supervision
• Do not mix alkaline, standard (carbon-zinc), or rechargeable
nickel-cadmium) batteries
• Do not mix old and new batteries
• Exhausted batteries to be removed
• Do not dispose of battery in fire; battery may explode or leak
• Do not dispose of product in fire; battery may explode or leak
How this Sportline Solo 920 Heart Rate Watch Works
It is useful to understand the basics of how the S-Pulse™
sensing technology works – as it will perform differently on
people of different age, skin type, body type, EKG or electro-
cardiogram signal strength, among others.
The S-Pulse™ technology measures the electronic signals that
pass through your body – that result from the beating of your
heart. Many are familiar with the EKG waveform – from either
personal experiences while at the hospital, or from popular
television medical shows. It is this same signal that passes
through your body that S-Pulse™ measures.
This measurement is obtained by the Watch’s two metal sensors.
The back metal plate of the Watch wrist is actually a primary
sensor that measures these electronic signals off your arm.
The ‘EKG’ measurement is done when you place your fingers
from one hand on the top sensor on the Watch that is attached to
your opposite arm. This creates a loop across your body that the
Watch can now read.
• The Sportline Solo 920 Heart Rate watch must be attached
to your wrist in order for the Heart Rate Measure function
to work.
Patents
This Sportline Solo 920 Heart Rate Watch and S-Pulse™
technology are result of and protected by the following patents:
US: .5,738,104 & 5,876,350
Europe: EPO 0861045B1
Disclaimer
This Sportline Solo 920 Heart Rate Watch is not a medical device,
or intended for use in any medical, or patient monitoring
application.
This Sportline Solo 920 Heart Rate Watch is not intended for use
in any commercial application.
Always consult a physician before starting any physical activity.
The features of your Watch may vary slightly from those described
in this User Guide. The information in this User Guide is
intended to be for information purposes only, and is subject to
change without notice.
S-Pulse™ is a trademark of Salutron Inc.
24
13
GUARANTEE CERTIFICATE – For purchases made in the U.S.
If at any time within one (1) year from the purchase date of this
product, it fails to perform properly because of defects in material
or manufacturing, return it prepaid to:
E&B GIFTWARE, LLC, 585 Oak Ridge Road, Hazleton, PA 18202
Complete this Guarantee Certificate and enclose it
(or a copy of it) with the product.
(PLEASE PRINT CLEARLY)
NAME _____________________________________________________
TEL ________________________________________________________
ADDRESS __________________________________________________
CITY _______________________________________________________
STATE ______________________________ ZIP __________________
STORE PURCHASED FROM ___________________________________
DATE OF PURCHASE ___________PURCHASE PRICE _____________
PROBLEM WITH PRODUCT ___________________________________
REPLACEMENT
This product has been carefully designed, manufactured and
packaged. If any parts are missing or damaged, please contact
us at the address above and we will replace the unit at no
charge. (Guarantee does not cover crystal or battery.)
For purchases made in the UK:
Should you experience problems with this item, please return it
to the point of purchase. This will not affect your statutory rights.
Alternatively return it to the address shown below for a
repair/replacement:
StarCase (UK) Ltd, Berkeley Business Park,
Wainwright Road, Worcester WR4 9FA
Metal
Back
Sensor
Back View
of the Watch
Front View
of the Watch
Mode
Button
ST/STP
(start/stop)
Button
Reset
Button
Sensor
Display
Light
Button
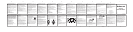
TH 12-22
TH 12-22
12:23
H153 on
6:00AL
00
0:0000
CHR
0
0:0000
CA
1:3150
dual
0:0100
TMRP
Time Mode Alarm
ChronographCountdown TimerCalorieDual Time
Heart Rate Alert
ON
Heart Rate Mode
Heart Rate Alert
OFF
12:23
6:00
AL
12:23
6:00
AL