


The clock uses a 12-hour format. P appears at the
left of the display for PM hours.
1. Grasp the tabs at either end of the control panel
cover and flip the cover up.
2. Repeatedly press
MODE until the current time
appears.
3. Press
SET. The time flashes.
4. Hold down /
H to set the current hour.
5. Repeatedly press (or hold down) /
M to set the
current minute. The time flashes for 10
seconds.
Using the Pulse Meter
Using the Stopwatch
Using the Countdown Timer
Your pedometer might not work properly for the following reasons:
1. You are not wearing it correctly.
2. You skip or shuffle.
3. You climb a steep hill or take short, quick steps down a hill.
Notes:
• A walking step is different from a jogging step, so you need to reset the step
length if you want to change from one to the other.
• To obtain more accurate measurements, be sure the pedometer is positioned
securely in a vertical position on your waistband or belt.
Measuring Your Step Length
To determine the distance you walk or jog, you must first measure your average
step length.
1. From a marked starting point, walk or jog 10 steps.
2. Measure the distance in feet.
3. Divide the distance by ten to get your average walking or jogging stride length. Round this average to the nearest 0.05 ft.
(1.52 cm) increment.
Note: To get a realistic average, we suggest you repeat the procedure several times.
Setting the Step Length
1. Repeatedly press MODE until the arrow points to mile. The display shows 0.00.
2. Press
STRIDE/WEIGHT. The default setting 2.50 ft appears.
3. While
2.50 ft appears, repeatedly press /H or /M to set the step length.
The pedometer increases or decreases the step length by 0.05 ft. each time you
press /
H or /M. The maximum step length is 6 ft.
Note: If you do not press any key for 10 seconds, the pedometer returns to the mile
mode. To check the set step length, press
STRIDE/WEIGHT.
Step Counter
1. Repeatedly press MODE until the arrow points to STEP. The display will show
00000 (or the last step counter digits). If the display does not reset to 00000
and the arrow points to START, press START/STOP. Then press RESET to reset
the display to
00000. If the arrow does not point to START, just press RESET.
2. Clip the pedometer securely on your waistband or belt near the front center part
of your waist.
3. Press
START/STOP to activate the pedometer, and start walking or jogging. The
pedometer displays the number of steps you have walked or jogged.
Distance Counter
1. Repeatedly press MODE until the arrow points to mile. The display shows 0.00.
2. Clip the pedometer securely on your waistband or belt near the front center.
3. Press
START/STOP to activate the distance counter, then start jogging or walking.
The pedometer displays the approximate distance you have walked or jogged.
Using the Calorie Counter
Resetting the Pedometer
Using the Pedometer
Setting the Time
Insulation Strip
Digital Pedometer
63-619
Your LifeWise Digital Pedometer combines a clock, a
pedometer, a calorie counter, a stopwatch, a timer
and a pulse meter in one convenient system. The
pedometer measures how far you walk or jog and dis-
plays either the distance you have traveled or the
number of steps you have taken. It also calculates the
approximate number of calories you have burned, and
detects your pulse rate. Its compact, light-weight
package lets you take it everywhere you go.
To prevent battery drain during shipping, your
pedometer is shipped with an insulation strip that
you must remove before use. Firmly grasp the strip
by its end and gently pull it out. The pedometer
sounds a four-beep tone twice and
12:00 appears.
1. Repeatedly press MODE until the arrow points to Cal. 00000
appears.
Note: If the display does not reset to
00000, and the arrow points
to
START, press START/STOP. Then press RESET to reset the dis-
play to
00000. If the arrow does not point to START, just press
RESET.
2. Press
STRIDE/WEIGHT. The default weight setting 110 Lb
appears.
3. Repeatedly press /
H or /M until the desired weight value
appears. If you do not press any key, the display returns to
00000 after 10 seconds.
4. Clip the pedometer securely on your waistband or belt near
the front center.
5. Press
START/STOP to activate the calorie counter. The indica-
tor arrow points to
START. Then start running or jogging.
Note: Body weight, age, metabolism, and activity level affect the
amount of calories you will burn.
1. Place the pulse meter on the desk or hold it on your hand.
2. Gently place your fingertip on the sensor at the top of the meter. Then use
another finger to press
PULSE. ♥ appears in the upper left corner of the
screen, and - - - - - appears.
3. The pulse meter beeps once and
0 appears. Then ♥ flashes and the pulse
meter beeps at the same rate as your heartbeat. After about eight seconds,
the pulse meter sounds a long beep and the pulse rate appears. The pulse
meter returns to the previous display after six seconds.
Notes:
• Do not press the sensor strenuously.
• If your fingers are cold or heavily calloused, the pulse meter cannot show an
accurate reading.
Error appears.
• The sensor’s range is from 40 to 199 beats per minute. Even if your heart rate
is over 199 beats/min, the meter will only display 199.
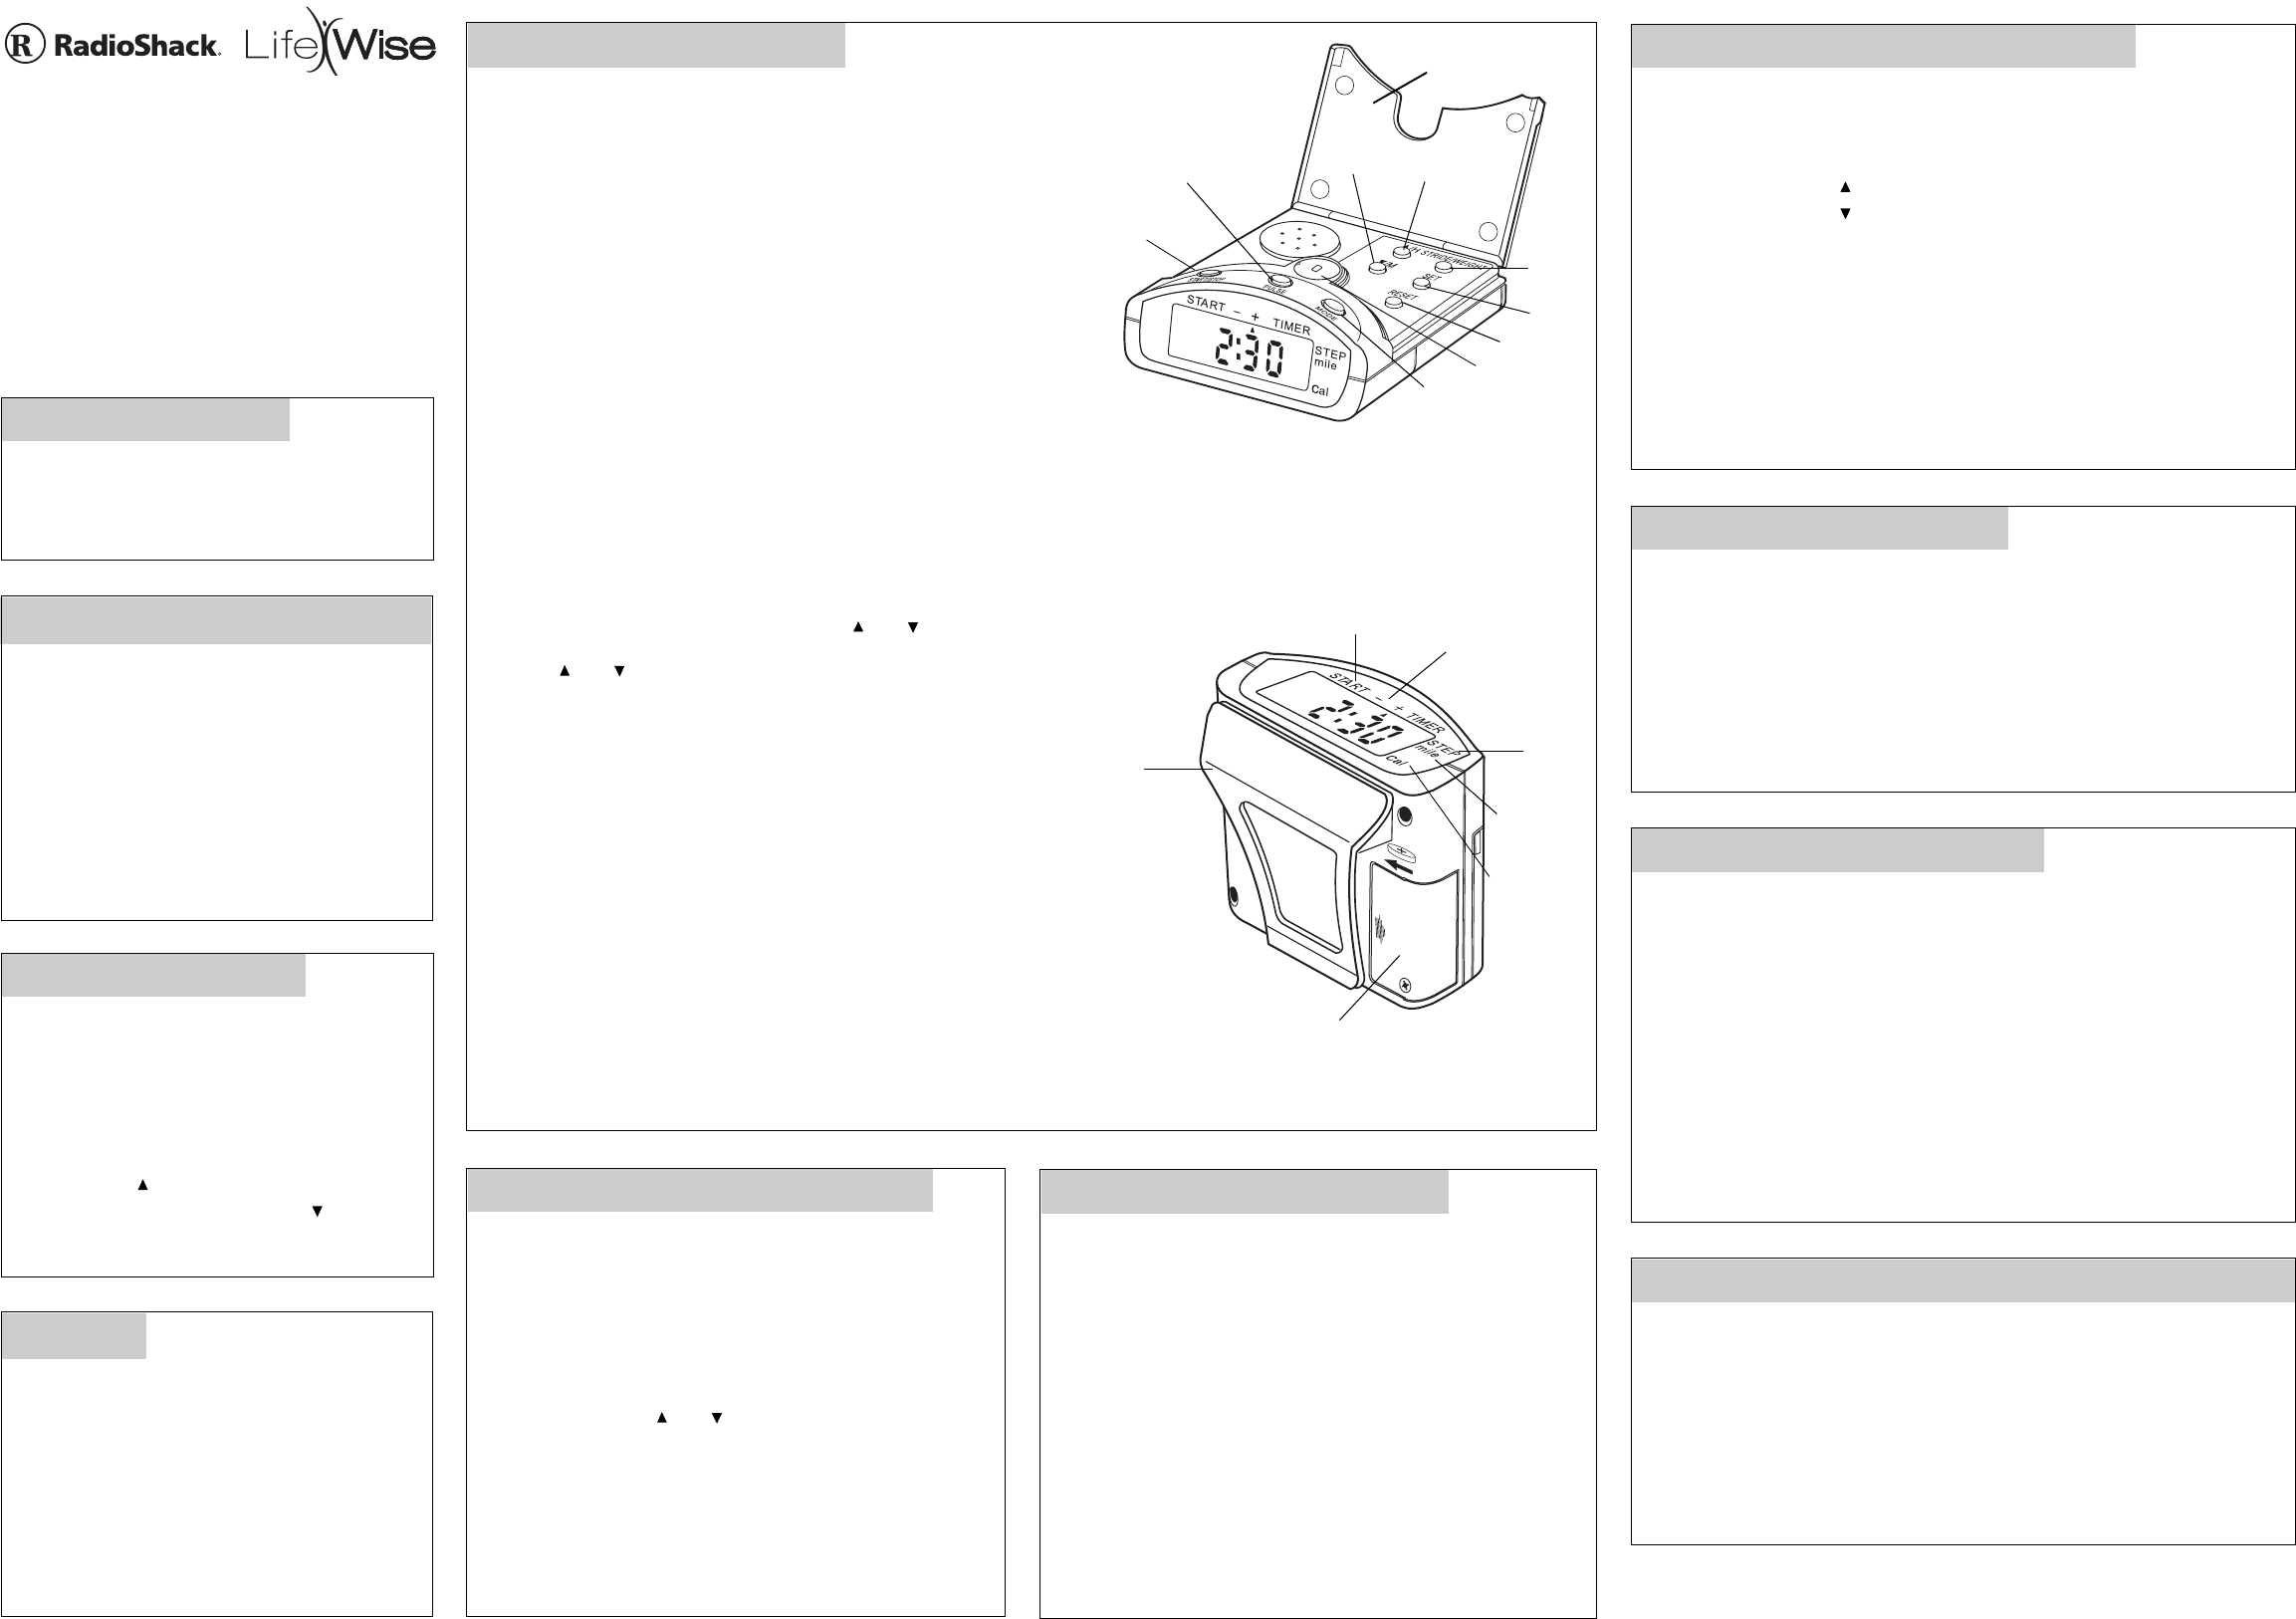
Start/Stop
Pulse
Mode
)
/H
(/M
Stride/
Weigh
t
Set
Reset
Pulse Sensor
Control Panel Cover
When you first use the pedometer, or any time you
replace the battery, you must reset the pedometer.
1. Repeatedly press
MODE until the indicator arrow
points to
STEP.
2. Press
START/STOP so the indicator arrow point-
ing to
START disappears.
3. Grasp the tabs at either side of the control
panel cover and flip the cover up.
4. Hold down
RESET for three seconds. The
display flashes once, and then the stored step,
distance, and calorie information are cleared.
The countdown timer lets you set a specific time limit and counts it down for you
(for example, if you want to jog for 30 minutes).
1. Repeatedly press
MODE until the arrow points to –TIMER. 0:00 appears.
2. Press
SET. The display flashes.
3. Press or hold down /
H until the desired count down hour displays.
4. Press or hold down /
M until the desired count down minute displays.
5. Press
START/STOP to start the countdown. To stop the countdown, press
START/STOP again. When the timer reaches 0:00, it sounds an alarm for 15
seconds. To stop the alarm, press any button.
Notes:
• If the countdown timer is running, press START/STOP to stop counting then
press
RESET to reset the timer to 0:00.
• If the timer is not running and the display is not set to
0:00, press RESET to reset
the timer to
0:00.
• The maximum countdown time you can set is 23 hours, 59 minutes.
1. Repeatedly press MODE until the arrow points to +TIMER. 00.00 appears.
2. Press
START/STOP to start counting. The elapsed time displays. To stop it,
press
START/STOP again.
Within the first hour, the stopwatch counts time from
00.00 to 59.59 (59
minutes and 59 seconds). After counting one hour, the screen shows from
1:00 to 23:59 (in terms of hours and minutes). Then, it resets to 00.00.
Note: After setting up your weight, step length, and a specific time for countdown
timer, you can press
START/STOP to activate the step, distance, calorie counters,
stopwatch and timer at the same time.
• Keep the pedometer dry. If it gets wet, wipe it dry
immediately.
• Use and store the pedometer only in room
temperature environments.
• Handle the pedometer gently and carefully. Do
not drop it.
• Keep the pedometer away from dust and dirt.
• Wipe the pedometer with a damp cloth occasion-
ally to keep it looking new.
Battery Compartment
Calorie
Indicator
Mile
Indicator
Step
Indicato
r
-/+ Timer Indicato
r
Start Indicator
©2003 RadioShack Corporation. 63-619
All Rights Reserved. Printed in Taiwan
RadioShack and RadioShack.com are trademarks 06A03
used by RadioShack Corporation.
Limited One-Year Warranty
This product is warranted by RadioShack against manufacturing defects in material and workmanship under normal use for [one (1) year] from the date of purchase from RadioShack
company-owned stores and authorized RadioShack franchisees and dealers. EXCEPT AS PROVIDED HEREIN, RadioShack MAKES NO EXPRESS WARRANTIES AND ANY IMPLIED
WARRANTIES, INCLUDING THOSE OF MERCHANTABILITY AND FITNESS FOR A PARTICULAR PURPOSE, ARE LIMITED IN DURATION TO THE DURATION OF THE WRITTEN
LIMITED WARRANTIES CONTAINED HEREIN. EXCEPT AS PROVIDED HEREIN, RadioShack SHALL HAVE NO LIABILITY OR RESPONSIBILITY TO CUSTOMER OR ANY OTHER
PERSON OR ENTITY WITH RESPECT TO ANY LIABILITY, LOSS OR DAMAGE CAUSED DIRECTLY OR INDIRECTLY BY USE OR PERFORMANCE OF THE PRODUCT OR ARISING
OUT OF ANY BREACH OF THIS WARRANTY, INCLUDING, BUT NOT LIMITED TO, ANY DAMAGES RESULTING FROM INCONVENIENCE, LOSS OF TIME, DATA, PROPERTY,
REVENUE, OR PROFIT OR ANY INDIRECT, SPECIAL, INCIDENTAL, OR CONSEQUENTIAL DAMAGES, EVEN IF RadioShack HAS BEEN ADVISED OF THE POSSIBILITY OF SUCH
DAMAGES.
Some states do not allow limitations on how long an implied warranty lasts or the exclusion or limitation of incidental or consequential damages, so the above limitations or exclusions may
not apply to you.
In the event of a product defect during the warranty period, take the product and the RadioShack sales receipt as proof of purchase date to any RadioShack store. RadioShack will, at its
option, unless otherwise provided by law: (a) correct the defect by product repair without charge for parts and labor; (b) replace the product with one of the same or similar design; or (c)
refund the purchase price. All replaced parts and products, and products on which a refund is made, become the property of RadioShack. New or reconditioned parts and products may be
used in the performance of warranty service. Repaired or replaced parts and products are warranted for the remainder of the original warranty period. You will be charged for repair or
replacement of the product made after the expiration of the warranty period.
This warranty does not cover: (a) damage or failure caused by or attributable to acts of God, abuse, accident, misuse, improper or abnormal usage, failure to follow instructions, improper
installation or maintenance, alteration, lightning or other incidence of excess voltage or current; (b) any repairs other than those provided by a RadioShack Authorized Service Facility; (c)
consumables such as fuses or batteries; (d) cosmetic damage; (e) transportation, shipping or insurance costs; or (f) costs of product removal, installation, set-up service adjustment or
reinstallation.
This warranty gives you specific legal rights, and you may also have other rights which vary from state to state
RadioShack Customer Relations, 200 Taylor Street, 6th Floor, Fort Worth, TX 76102
12/99
Replacing the Battery
Your pedometer comes with one CR2032 lithium battery installed. If
the display dims, replace the battery.
1. Use a Phillips screwdriver to remove the screw from the battery
compartment cover. Remove the cover.
2. Remove the old battery.
3. Install the new battery with its positive (+) side up.
4. Replace the cover and tighten the screw.
Warnings:
• If you do not plan to use your pedometer for a month or more,
remove the battery.
• Keep button-cell batteries away from children. Swallowing a but-
ton-cell battery can be fatal.
• Always dispose of batteries promptly and properly. Never burn or
bury them.
Care
Belt Clip
A Look at the Control Panel