


Zone Trainer
MODEL: SE331
USER MANUAL
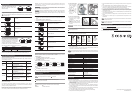
CONTROL BUTTONS / LCD DISPLAY
MODE/- +/ST/SP
EL/Lock
1
2
3
4
B C D
A
5
6
7
1. : key tone deactivated
2. Time; heart rate measurements; mode banners; exercise time / data
3. : low battery indicator
4. : key press prompt (press MODE/-)
5. : keypad locked
6. :key press prompt (press +/ST/SP)
7. Key press prompt (Tap on lens): enter sub setting mode; conrm
setting
A. EL/LOCK: Activate backlight; lock / unlock keypad
B. MODE/-: toggle between modes; exit current display and return to previous screen; initiate
search for HR signal; decrease value of the setting; toggle setting options
C. Tap on lens: enter setting mode; conrm setting; toggle through displays
D. +/ST/SP: start / stop stopwatch; increase value of the setting; toggle setting options
STARTING YOUR WATCH (FIRST TIME)
Press and hold any key to activate the LCD screen. The watch will prompt you to set your
user prole. (Go directly to ‘Set user prole’ section, step 4).
IMPORTANT
• To ensure accurate calculations with your exercise, you are strongly encouraged to set the
watch and user proles before exercising.
• Remember to set the proles after every battery replacement or reset.
NOTE When the watch is left idle for 30 seconds during set up, it will automatically exit the
setting mode and display the time.
NAVIGATING THROUGH THE OPTIONS
KEY PRESS PROMPTS
MODE/- +/ST/SP
The watch has been designed with prompts to guide you
through the settings and displays.
TAP ON LENS
The tap on lens feature allows you to toggle through real time tness data while you are
exercising; review stored data of an entire work-out session (memory mode) as well as
navigate through the settings (setting mode).
To use the tap on lens: Simply tap on the lens.
MODES
There are 4 modes. Press MODE/- to toggle through the different modes.
MODE BANNER MAIN DISPLAY
Time (Default
display)
Exercise
EN
Memory
Set up
SET USER PROFILE
When prompted to set user prole after starting the watch for the rst
time, the screen below will be shown. Go directly to step 4.
For normal setting procedure:
1. Press MODE/- repeatedly to select “SET”, “TIME” will be displayed shortly after.
2. Press +/ST/SP repeatedly to navigate to “USER”.
3. Tap on lens to enter user prole setting options.
4. Set user prole according to the following order: gender, age, weight unit, weight, height
unit, height, tness level, by pressing the following buttons:
• +/ST/SP to increase value or toggle options
• MODE/- to decrease value or toggle options
• Tap on lens to conrm
“DONE” indicates user prole setting has been completed. This is only shown when setting
the watch for the rst time or after battery reset.
FITNESS LEVEL
The tness level is based on your own self-assessment of how t you are (depending on the
amount of exercise you regularly perform).
FITNESS
LEVEL
DESCRIPTION
BEG
Beginner – You haven’t exercised for a while and do not usually participate in
programmed recreation sports or exercise.
INT
Intermediate – You are engaged in modest physical activity (such as
golng, horseback riding, table tennis, calisthenics, bowling, weight lifting or
gymnastics) 2-3 times a week, totaling 1 hour per week.
ATH
Athelete – You actively and regularly participate in heavy physical exercise
(such as running, jogging, swimming, cycling, or skipping rope) or engage in
vigorous aerobic exercise (such as tennis, basketball or handball).
NOTE You must enter the tness level to calculate the calories burned.
TIP The watch generates calculations based on the inputted data to show the calorie / fat
burned and the period exercised at the chosen intensity (target HR zone range) to help you
track your progress over time. As you progress, update weight and tness level to help the
watch give you an up-to-date reection of your physical condition.
SETTING MODE
After setting your user prole, the “USER” screen below will be shown. You can continue with
the other settings by pressing +/ST/SP repeatedly (see step 2 below).
However, if the user prole was set for the rst time or after battery reset, the watch will
automatically return to the default time display. Start with step 1.
1. Press MODE/- repeatedly to select “SET”, “TIME” will be displayed shortly after.
2. Press +/ST/SP to toggle between settings.
+/ST/SP
+/ST/SP
+/ST/SP
+/ST/SP
+/ST/SP
3. Tap on lens to enter into individual setting.
4. Start setting the selected option by pressing the following buttons:
• +/ST/SP to increase value or toggle options
• MODE/- to decrease value or toggle options
• Tap on lens to conrm
5. Repeat steps 2-4 for all settings.
Settings Setting options (Press +/ST/SP or MODE/- and Tap to conrm)
TIME
Hour format
Hour / minute
DATE
Display format (day-month or month-day)
Year
Month
Day
USER
Gender
Age
Weight unit
Weight
Height unit
Height
Activity level
HR ZONE
On / Off
HR Zone range*
TOGGLE
On/Off
(Enable display to auto toggle during exercise )
* For further details please refer to the “Understanding Heart Rate” section in this manual.
WEARING THE CHEST BELT
If you only wish to use the stopwatch function (and not record any tness data), skip
to ‘Start exercising’ section.
Chest belt
The chest belt counts your heartbeat and transmits this data to the watch.
1. Wet the conductive pads on the underside of the chest belt with a few drops of water or
conductive gel to ensure solid contact.
2. Holding the elastic strap, thread the plastic tab
through the eyelet of the chest belt unit. Turn it
slightly and snap into place.
3. Place the heart rate chest belt slightly below your
chest and wrap the strap around your chest. Pass
the other tab through the remaining eyelet and
snap into place.
To ensure an accurate heart rate signal, adjust the
strap until the belt sits snugly below your pectoral
muscles.
TIPS
• The position of the chest belt affects its performance.
• In dry, cold climates, it may take several minutes for the chest belt to function steadily.
This is normal and should improve with several minutes of exercise.
NOTE To maintain the best performance of your chest belt, please handle it with care
according to the following:
• Do not wrap the chest belt in a wet towel nor with other wet materials.
• Do not store the chest belt in a hot (about 122°F) and humid (about 90%) environment.
• Do not place or wash the chest belt under running water, instead clean it with a wet
cloth.
• Do not place the conductive rubber face down on a metal table or surface.
• Properly dry the chest belt immediately after use.
TRANSMISSION SIGNAL
The heart rate chest belt and watch have a maximum transmission range of about 25 inches.
They are equipped with the latest digital coding system to reduce signal interference from the
environment, as well as analog technology.
Search for heart rate signal:
• Press MODE/- to select “EXE”, “HR BELT” will be displayed shortly after to indicate
system is searching for chest belt signal.
NOTE Whenever the watch is searching for the chest belt signal (manual or automatic
search), make sure that the chest belt is no further than 4 inches from the watch.
Your watch will advise you which system it is using and the signal status by displaying the
following icons:
Icon Description
Searching for a signal
(Press +/ST/SP to skip search and only use
stopwatch function)
A signal has been found and the digital system
is being used
A signal has been found and the analog system
is being used
(no symbol)
No signal has been found
Signal unsuccessful?
The signal search will take approximately
30 seconds. If after 30 seconds the “NO HR
BELT” is displayed, then your signal search
has been unsuccessful. You can either:
1) Press +/ST/SP and proceed to use the watch as a stopwatch (without exercise recording
function); or
2) Press MODE/- to force another signal search.
Analog or Digital?
The digital signal is less susceptible to signal interference and is suitable in crowded areas or
where there are other monitors / equipment. You should only switch to the analog transmission
signal if the situation in point 2 occurs (see ‘Encountering difculties?’ below).
To switch from digital to analog or analog to digital system:
1) Press the chest belt button for more than 6 seconds.
2) Press and hold MODE/- on the watch to force a signal search.
Encountering difculties?
In the event that you experience a weak signal or your signal is disrupted by interference in the
environment, follow the instructions below to identify and resolve the situation.
1. The signal is weak - the watch may only show “0”:
• Shorten the distance between the heart rate chest belt and watch.
• Re-adjust the position of the heart rate chest belt.
• Check the conductive pads are moist enough to ensure solid contact.
• Check the batteries. If they are low or exhausted, the transmission range may be
shortened.
• Press and hold MODE/- to force a signal search.
2. The gym equipment does not seem to work with your chest belt and the digital icon is
displayed:
• Most gym equipment is compatible with the analog system . Press and hold the
chest belt button for more than 6 seconds to change from digital to analog. Then press
and hold MODE/- to force a signal search.
3. Interference from another person’s heart rate monitor - their heart rate readings appear on
your watch, or the readings may uctuate:
• Force another signal search by pressing the chest belt button then press and hold
MODE/- on the watch. Do not press and hold the chest belt button, as it will change
the transmission signal from digital to analog.
4. The signal is jammed - “NO HR BELT” appears on the display after several tries:
• There is too much interference in the environment for your heart rate monitor to
function. Move to an area where the watch can register your heart rate reading.
WARNING Signal interference in the environment can be caused by electromagnetic
disturbances. These may occur near high voltage power lines, trafc lights, overhead lines
of electric railways, electric bus lines or trams, televisions, car motors, bike computers, some
motor driven exercise equipment, cellular phones or when you walk through electric security
gates. Under interference, the heart rate reading may become unstable and inaccurate.
START EXERCISING
If you wish to receive comprehensive calculations (such as your heart rate and the calorie / fat
burned) for an exercise session, before you start, allow the watch a few seconds to search for
chest belt rst. For detailed information or if encountering difculties, refer to “Transmission
signal” section above.
START TAKING MEASUREMENTS
If using only the stopwatch function:
1. Press MODE/- to select “EXE”, “HR BELT” will be displayed shortly after to indicate system
is searching for chest belt signal.
2. Press +/ST/SP twice to skip heart rate signal search and start stopwatch.
MODE/- +/ST/SP
START
+/ST/SP
If using chest belt to receive and record tness data:
1. Press MODE/- to select “EXE”, “HR BELT” will be displayed shortly after to indicate system
is searching for chest belt signal. Watch will display system used (analog / digital), then
the stopwatch screen.
2. Press +/ST/SP to start stopwatch.
MODE/-
+/ST/SP
START
TIP You can view the time while exercising. Press MODE/- to view time.
PAUSE, RESUME / STOP
If you need to take a break during exercise, press +/ST/SP.
When ready, press +/ST/SP to resume exercise.
To stop exercise and save data: Press +/ST/SP to pause, then press MODE/-.
After a long pause, the watch will time out and automatically save the data.