


PULSEMETER
INSTRUCTION MANUAL
INTRODUCTION
Congratulations on your purchase of the easy-to-use lightweight Pulsemeter.
This product has several unique features to monitor and display useful
information for individuals who frequently exercises or want to monitor
their heart rate.
Designed for ease-of-use, this product can be worn like a necklace or easily
tied to a belt. A specially-designed wristband (optional feature) enables the
product to be worn like a wristwatch.
The unit's trouble-free qualities are enhanced through the products lightweight
and small size.
FEATURES
1. Pulse monitor
2. 12 /24 hr. real-time clock
3. Count-up / count-down timer
4. EL back light
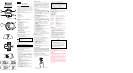
DESCRIPTION AND FUNCTION OF PARTS
[FIG. A]
A. LCD
- Single-line, three-function display
B. [MODE / SET] Button
- Alternates between current-time and timer modes
- Initiates settings changes
C. Pulse Sensor
- Detects a person's pulse rate
D. [START / STOP] Button
- To start or stop the count-up or count-down timer
E. [PULSE ] Button
- Sets the unit to pulse display from other display modes
- Returns unit to previous mode from Pulse mode
F. [ RESET / ADV] Button
- Activates EL back light
- Resets count-up / count-down timer
- Increases values when setting the time or count-down timer
G. Battery Compartment [FIG. B]
- Insert one (1) CR2032 3V lithium cell
BATTERY INSTALLATION: MAIN UNIT
1. Carefully unscrew the back panel.
2. Insert one (1) CR2032 3V lithium cell or equivalent [FIG. B].
3. Replace the battery compartment door.
Note: If not disposed properly, batteries can be harmful. Protect
the environment by taking exhausted batteries to authorized
disposal stations.
WEARING THE PULSEMETER
With the attached cord, the device can be worn like a necklace [FIG. C].
Alternately, the cord can be used to secure the device to a waist belt or
clothing.
Note: Optionally sold, a specially designed wrist strap worn in the
same manner as a watch [FIG. D] and [FIG. E].
WEATHER RESISTANCE
Designed for active outdoor use, this product is weather resistant and can
be used under normal weather conditions. Avoid prolonged exposure to
extreme weather conditions such as extreme cold or rain.
ABOUT THE CLOCK
In clock mode the unit will display the time. The time can be displayed in a
12-hour or 24-hour format as hours, minutes and seconds.
To set the current time:
1. If the count-up / down timer is displayed, press [MODE / SET] to
enter the clock mode [FIG F]. From pulse mode, press [PULSE ] to
exit pulse mode followed by [MODE / SET] to toggle between clock
and count up / down timer modes.
2. In clock mode, press and hold [MODE / SET] for two seconds. The
12-hour value will flash.
3. Press [ RESET / ADV] to make a selection between 12-hour and
24-hour format.
4. Press [MODE / SET], the hour digits will flash.
5. Press [ RESET / ADV] to advance the numbers until the
appropriate hour digit is displayed. Holding down the button will
increase the value rapidly.
6. Press [MODE / SET], the minute digits will flash.
7. Again, press [ RESET / ADV] to advance the numbers until the
appropriate minute digit is displayed.
8. Press [MODE / SET], the "seconds" will flash.
9. Again, press [ RESET / ADV] to reset the "seconds" to zero.
When the "seconds" correspond to the correct time and then press
[MODE / SET] to confirm and exit.
ABOUT THE TIMER
The timer can count up from zero or count down from a pre-set time.
Starting from zero the timer can count to a maximum time of 29-hours, 59-
minutes, and 59-seconds (29:59' 59"). The unit will also count down from
29-hours, 59-minutes, and 59-seconds to zero. In count-down timer mode,
once the unit reaches zero, if not stopped, the unit will continue and start
counting upwards.
To indicate that the unit is in count-up timer mode an up [ ] arrow will be
displayed. Respectively, the count-down mode display is indicated by a
down [ ] arrow.
To use the count-up timer:
1. If the clock is displayed, press [MODE / SET] to enter the count-up
/ down timer mode [FIG. G]. From pulse mode, press [PULSE ] to
exit pulse mode followed by [MODE / SET] to toggle between clock
and count-up / down timer modes.
2. If the count-up timer display does not show zero hours, minutes, and
seconds, Press and hold [RESET] for 2 seconds to reset the count-up
timer to zero.
3. Press [START / STOP] to start the timer.
4. Press [START / STOP] again to stop and pause the timer.
5. Press and hold [RESET] for 2 seconds to reset the timer to zero.
To use the count-down timer:
1. If the clock is displayed, press [MODE / SET] to enter the count-up
/ down timer mode [FIG. H]. From pulse mode, press [PULSE ] to
exit pulse mode followed by [MODE / SET] to toggle between clock
and count-up / down timer modes.
2. To set the count-down timer, press and hold [MODE / SET] for 2
seconds, the hour digits will flash.
3. Press [ RESET / ADV] to advance the numbers until the
appropriate hour digit is displayed. Holding down the button will
increase the value rapidly.
4. Press [MODE / SET], the minute digits will flash.
5. Again, press [ RESET / ADV] to advance the numbers until the
appropriate minute digit is displayed.
6. Press [MODE / SET], the "seconds" will flash.
7. Again, press [ RESET / ADV] to advance the numbers until the
appropriate minute digit is displayed.
8. Press [MODE / SET] to confirm and exit.
9. Press [START / STOP] to start the count-down timer.
10.Press [START / STOP] again to stop and pause the timer.
When the timer reaches zero an alarm will sound for 30 seconds. The timer
will continue to count in an upwards direction indicated by a corresponding
up [ ] arrow.
To stop the count-down timer alarm:
Press any key, the alarm and timer and will stop.
RESETTING THE COUNT-DOWN TIMER
The count-down timer can be reset to the originally-set count-down time.
To return to the originally-set count-down time:
1. Press [START / STOP] to stop the count-down timer.
2. Press [ RESET / ADV] and hold for 2 seconds. The display will
return to the originally-set count-down display.
To clear the count-down timer to zero:
1. Press [MODE / SET] and hold for 2 seconds. The hour digits will
flash.
2. Press [MODE / SET] to bypass the hour, minute and seconds digits.
The timer function will return to zero.
THE PULSEMETER
A person's pulse rate indicates the number of times that the heart beats
within a given amount of time. This unit attempts to calculate approximately
how many times a heart will beat in one minute. Many factors such as
smoking, eating, breathing and stress can affect the rate at which a person's
heart will beat. Monitoring pulse rate can be useful for determining how hard
the heart is working at a given level of activity. Such information can be used
to plan an effective exercise routine.
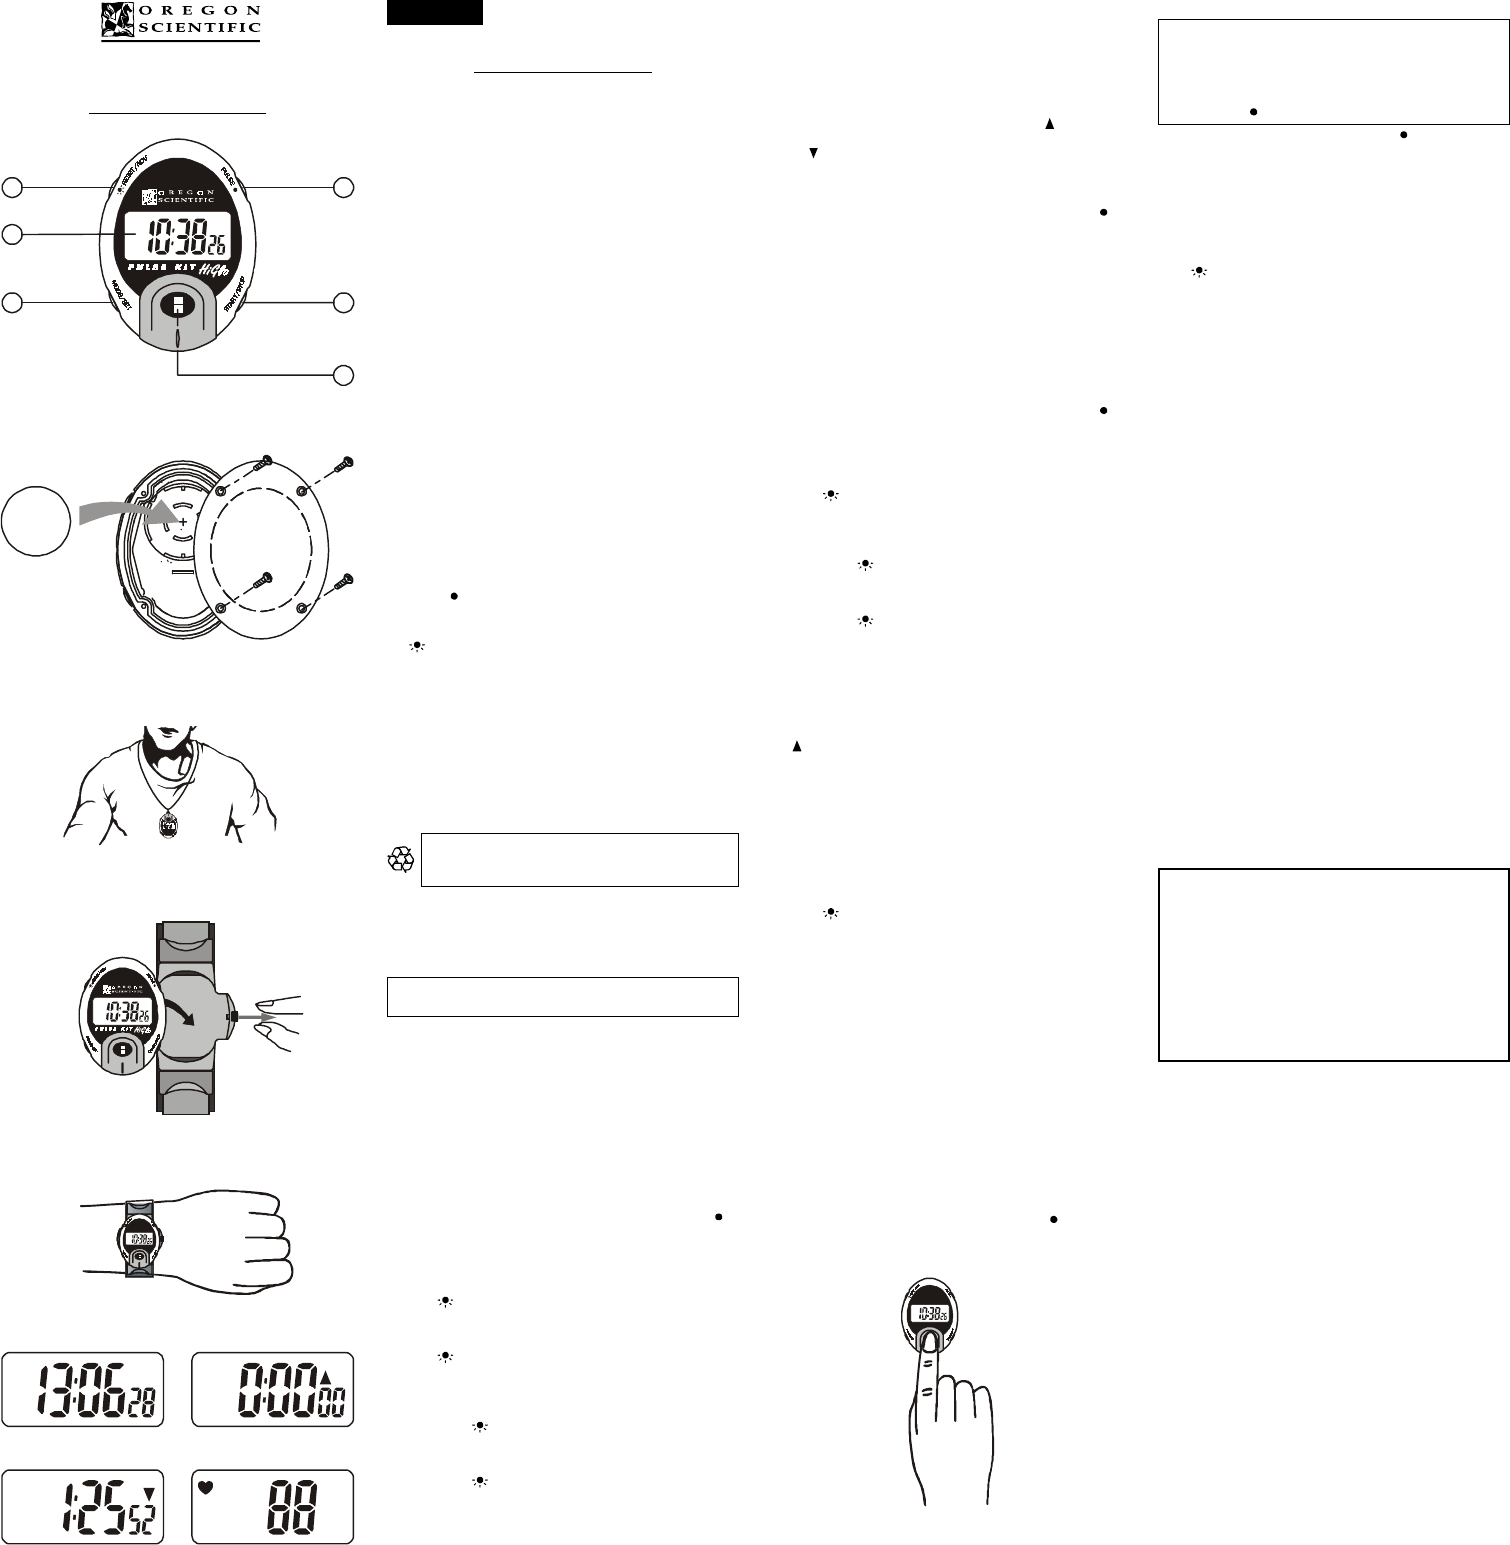
HOW TO USE THE PULSEMETER:
1. In either current-time or timer display, press [PULSE ], the display
will show a heart.
2. Position your right index finger so that the padded portion is over the
pulse sensor.
3. Maintain a steady position, holding too forcefully or too lightly may
result in an incorrect reading.
4. After several seconds a pulse rate will display. [FIG. I]
Note: When your finger is positioned properly, the heart icon on
the display will flash. This indicates that the unit is reading a pulse.
The unit will display the number of beats per minute of your heart.
If, for some reason, the unit cannot read a pulse within a given time it
will automatically return to the previous display mode.
Press [PULSE ] and try taking your pulse again.
5. To exit pulse mode display, press to [PULSE ] followed by
[MODE / SET] to toggle between clock and count-up / down timer
modes.
THE BACK LIGHT
Ideal for nighttime viewing of the display, the LCD can be illuminated.
The EL back light casts a greenish-blue light evenly across the LCD
making information easy to read.
To activate the back light:
Press [ RESET / ADV].
SPECIFICATIONS
Operating Modes : Clock mode, timer mode and pulse mode
Real-time clock : 12 hour / 24 hour with hour/minute/second
display
Count-up timer : To 29 hours, 59 minutes, 59 seconds
Count-down timer : From 29 hours, 59 minutes, 59 seconds
Pulse range : 40 to 237 bpm
Weather resistance : Weather proof for use under normal weather
conditions
Power source : 1 x CR2032 3V lithium cell
Expected Battery Life : Approximately one year (once-per-day pulse
and backlight usage)
Product size : 43"(D)x1.57" (W')x 2.13"(L) or
11 (D) x 40 (w) x 54 (L) mm
Weight : 0.82 ounces or 23.25 gms (without wrist strap)
MAINTENANCE
1. Do not immerse the unit in water. If the unit comes in contact with
water, dry it immediately with a soft lint-free cloth.
2. Do not clean the unit with abrasive or corrosive materials. Abrasive
cleaning agents may scratch the plastic parts and corrode the
electronic circuit.
3. Do not subject the unit to excessive: force, shock, dust, temperature,
or humidity. Such treatment may result in malfunction, a shorter
electronic life span, damaged batteries, or distorted parts.
4. Do not tamper with the unit's internal components. Doing so will
terminate the unit's warranty and may cause damage. The unit
contains no user-serviceable parts.
5. Only use new batteries as specified in this instruction manual.
Read this instruction manual thoroughly before operating the unit.
CAUTION
— The content of this manual is subject to change without
further notice.
— Due to printing limitation, the displays shown in this manual
may differ from the actual display.
— The manufacturer and its suppliers held no responsibility to
you or any other person for any damage expenses, lost
profits, or any other claim arise by using this product.
— The contents of this manual may not be reproduced without
the permission of the manufacturer.
CUSTOMER ASSISTANCE
Should you require assistance regarding this product and its operation, please
contact our customer care department at 541-868-8205 or via email at
helpme@oscientific.com.
WARRANTY
This product is warranted to be free of manufacturing defects for a period of
3 months from date of retail purchase. Defective product should be directed
to the place of retail purchase for exchange.
Should this not be possible, contact our customer care department for
assistance and a return material authorization. No returns may be made
without a return authorization. Please retain your retail receipt as you may
be asked to provide a copy of it for proof of date purchased.
This warranty does not cover product subjected to abuse, misuse, accidental
damage or tampering.
Upon return of the defective product, Oregon Scientific will at its discretion,
replace the product with either a new or a tested reconditioned product.
Should the product be out of warranty, the consumer may purchase
directly from Oregon Scientific a replacement at reasonable cost plus
shipping and handling.
ENGLISH
PULSEMETER
MODEL: PM138E / PM138
INSTRUCTION MANUAL
PM
FIG. C
FIG. D
FIG. E
AM
TIMER
PM
AM
TIMER
PM
AM
TIMER
PM
AM
TIMER
PM
FIG. B
FIG. H FIG. I
FIG. F FIG. G
CR2032
+
PM
PM
PM
(PM138E)
FIG. A
PM
F
B
A
E
D
C