


27
www.keystness.com
Calibrating Treadmill
Do not attempt to calibrate the treadmill unless an Error Code is present.
Our treadmill is equipped with a software package that will perform a calibration sequence unique to your specific model number.
Please perform the following steps to calibrate the Keys T6.0 Treadmill.
1. Unplug power cord from outlet strip.
2. Attach Safety Key to console.
3. Plug power cord into outlet strip.
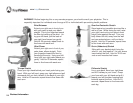
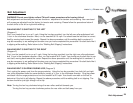
4. Initiate calibration sequence. Locate the hole on the back of the console (indicated by sticker) and insert eraser end of a pencil through hole
to adjust. Press the calibration switch twice. You will then hear a beep.
5. CL21 should appear in the Time window.
Note: During the calibration sequence, the Time window will display which step you are at in the process (C21, C22,
C23 and so on). The CAL/DIST window will display which key should be pressed next. For example, “E” for Enter,
“P” for Power, or “SS” for Start / Stop.
6. CL21: MPH or KPH will be flashing in the Speed window, pressing the Speed +/ - button will toggle options. Choose MPH (KPH), press Enter.
You may change this again if you would like to go by Kilometers.
7. CL22: 8, 10, or 12 (13, 16, or 20 in KPH mode) will be displayed in the Speed window, pressing the Speed +/ - button will toggle options.
Choose 12 (or 20 for KPH mode). Incline window will also display a value. This value needs to be 108, adjust with incline +/- button if neces-
sary to get to 108 . Press Enter.
8. CL23: FFF or UUU will be displayed in the Speed window, pressing the Speed +/ - button will toggle options. Choose UUU, press Enter.
9. CL24: 111 or 222 will be displayed in the Speed window, pressing the Speed +/ - button will toggle options. Choose 111, press Enter.
10. CL25: nHU or HrU will be displayed in the Speed window, choose nHU by pressing the speed +/- button. Press Enter to confirm selection.
11. CL26: OPA or OPI will be displayed in the Speed window, pressing the Speed +/ - button will toggle options. Choose OPA, press Enter.
12. CL27: Blank (nothing), “a”, “b”, “c”, “d” or “e” will be displayed in the Incline window, pressing the Speed +/ - button will toggle options. Choose
“a”, press Enter.
13. CAL/DIST window will display “55”. Press Start / Stop. “E” will display in CAL/DIST window.
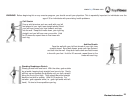
14. At this time, make sure you are not standing on the walking belt, as the machine will automatically initiate belt movement and run through a
complete calibration and diagnostic routine.
Press Enter. Belt will begin to move. Unit will begin self-calibration.
15. When Speed and Incline calibration has finished, press Power button twice, display should be blank, and treadmill should be ready for use.
To avoid possible damage to the treadmill and the possibility of injury, do not operate the treadmill until the problem is corrected. Call
Calibration Sequence