2. 3. 4.
5. 6. 7. 8.
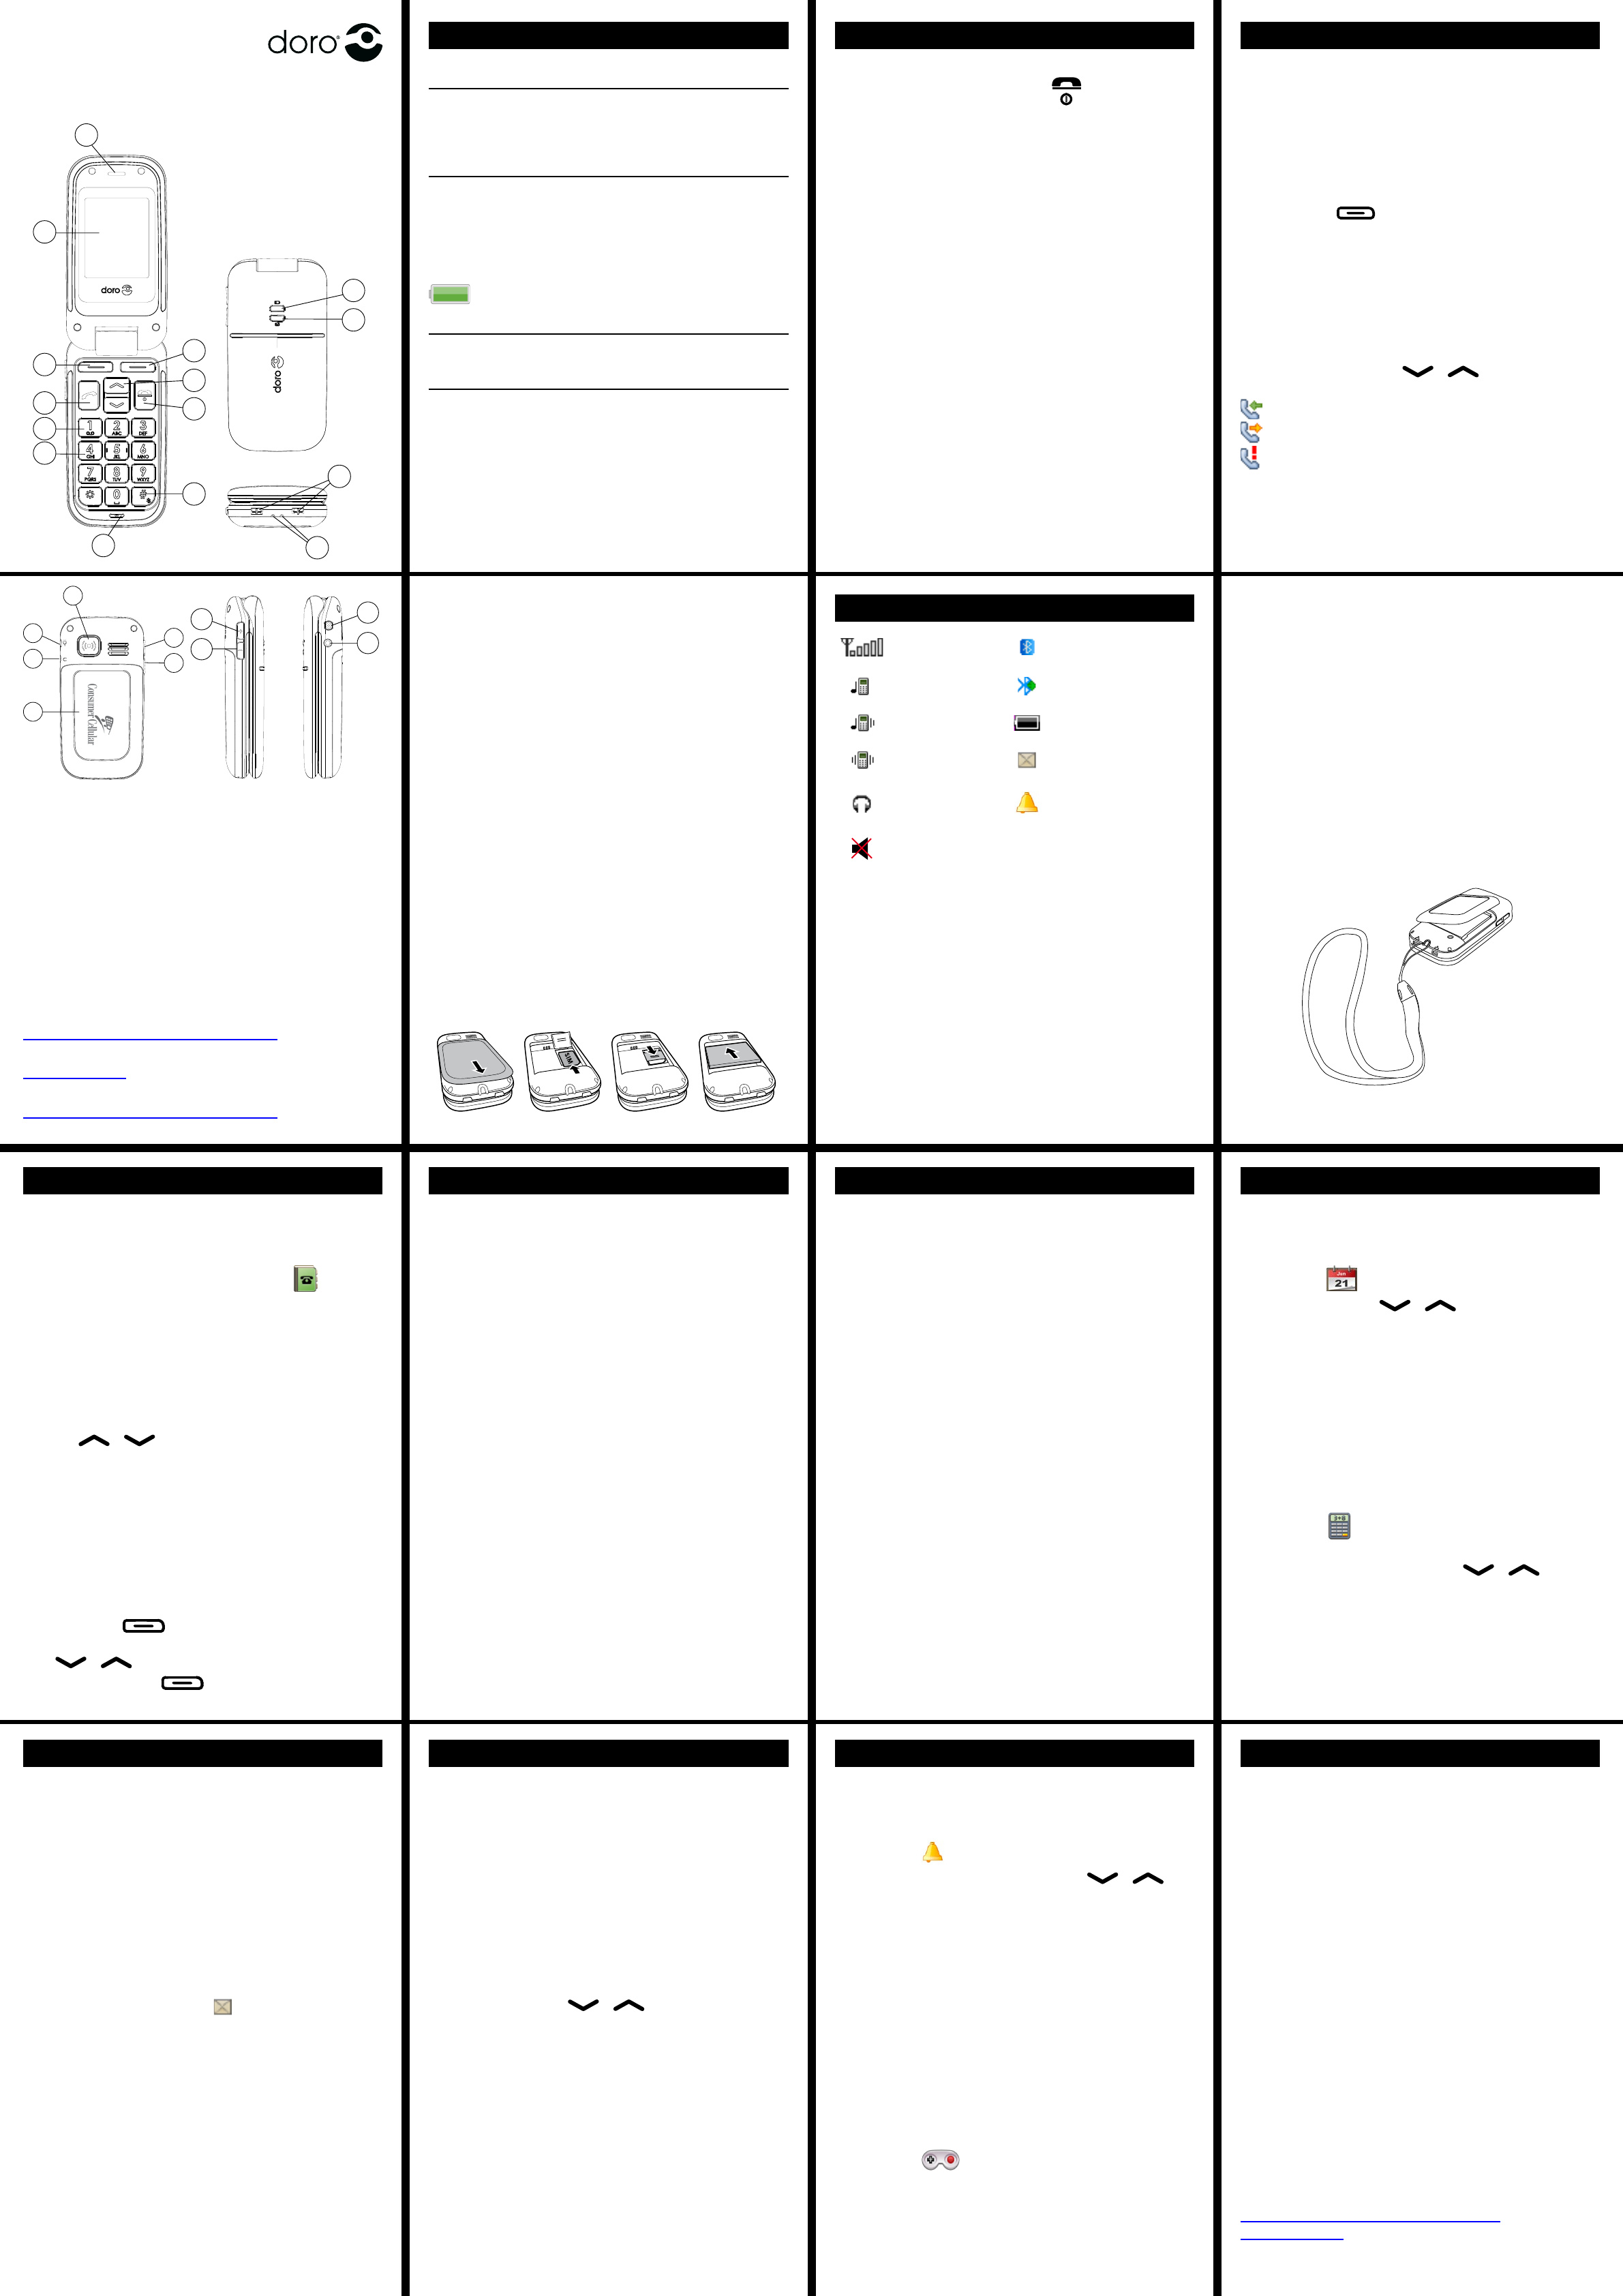
Loudspeaker
Display
Left soft key
Call key
1 / Voice mail
Numeric keypad
Microphone
# / Silent mode on/off
End call/Power on/off
Arrow keys
Right soft key
For lanyard attaching
1.
2.
3.
4.
5.
6.
7.
8.
9.
10.
11.
12.
Charging contacts, for
use with charging stand
(not included)
Led light (new message/
missed call)
Led light
(battery level low)
Emergency call key
Charging socket
Headset socket
Battery cover
Side key +
Side key -
13.
14.
15.
16.
17.
18.
19.
20.
21.
PhoneEasy
410gsm
The complete User Guide can be downloaded at
www.ConsumerCellular.com/support
OR
www.doro.com
You may also view helpful how-to videos at
www.ConsumerCellular.com/support
Quick Start Guide
Getting Started
Charging
Warning!
Only use batteries, charger and accessories that have
been approved for use with this particular model.
Connecting other accessories may be dangerous and
may invalidate the phone’s warranty.
To charge the battery, connect the AC power
adapter to a wall socket and to the charging
socket
y
on the right side of the phone.
It takes approximately 3 hours to fully charge the
battery.
is displayed on the screen when charging is
completed.
Note
Before removing the battery cover, turn off the phone
and disconnect the charger.
Installing the SIM card and battery
The SIM card and battery are normally pre-
installed for you. Follow these instructions should
you ever need to access them yourself.
The SIM card holder is located behind the battery.
Remove the battery cover by pressing it carefully
down and sliding away from the emergency call key.
Remove the battery if it is already installed.
Press lightly on the cardholder and carefully slide it
towards the emergency call key.
The SIM card holder can now be folded into an
upright position.
Placing the SIM-card on the marked area of the
compartment. Make sure that the SIM card’s
contacts are facing downwards and that the cut-off
corner is placed accordingly with the marked area.
See picture. Take care not to scratch or bend the
contacts on the SIM card.
Fold the SIM-card holder down and carefully slid it
away from the emergency call key until it “clicks”
into place.
Insert the battery by sliding it into the battery
compartment with the contacts facing towards the
emergency call key.
Replace the battery cover until it “clicks” into place.
1.
2.
3.
4.
5.
6.
7.
8.
Helpful Functions
Volume control
Use the side keys +/– to adjust the sound volume.
The volume level is indicated on the display. When
a call is in progress, the volume control adjusts the
earpiece volume. When the phone is ringing, the
volume control adjusts the ringer volume.
Soft keys
The soft keys
have multiple functions. The
current key function is shown above the soft key on
the display.
Call log
Answered, missed, and outgoing calls (20) are saved
in a combined call log.
Press
q
with no numbers entered on the
screen.
Use the arrow keys / to scroll through
the call list.
= Incoming call
= Outgoing call
= Missed call
Press
q
to dial the highlighted number or
press Options for the following settings:
View Show details for the selected call
Delete Delete the call
Delete all Delete all calls in the call log
Save Save the number in the Phonebook
Create new Creates new contact in the Phonebook
Update Update an existent contact in the
Phonebook
Headset
When a headset is connected, the internal
microphone in the phone is disconnected. You canYou can
use the answer key (if it has one) on the headset
cable to receive and end calls.
1.
2.
3.
Using Phonebook
The Phonebook can store 100 entries with 3 phone
numbers in each entry.
Creating a Phonebook entry
Press Menu, scroll to Phonebook and
press OK.
Select -New contact- and press Add.
Enter a name. Delete with Clear.
Note! Each time you press a key you will scroll
through the letter options. Once the letter youOnce the letter you
would like is highlighted, pause for a moment
and it will be selected. You can then begin
pressing a key to select the next letter.
Use / to select Mobile, Home
number or Ofce number, and enter the
phone number(s), then press Save.
Press
L
to return to standby.
Deleting entries in Phonebook
->Menu->Phonebook->Scroll to desired
entry->Options->Scroll to �elete->OK->Options->Scroll to �elete->OKOptions->Scroll to �elete->OK
Press Yes to conrm or No to Cancel.
Making a call from the Phonebook
Press the key under Name to open the
Phonebook.
Use / to scroll through the Phonebook.
Press the send key under Call to dial the
highlighted entry.
Text Messaging
Creating and sending messages
->Menu->Messages->Write message
Type the message you would like to send. See
Text input tips for help.
When message is ready press �one.
Hightlight desired send option and press OK.
Enter in phone number to send to or press
Search to select an entry in your Phonebook
and press OK.
Reading an incoming message
When you receive a message while your phone is
on, the screen will display . Press Read to read
the message.
You can also read messages by accessing the
inbox.
->Menu->Messages->Inbox
To read messages you have sent and saved
enter.
->Menu->Messages->Outbox
1.
2.
3.
4.
5.
1.
2.
3.
Getting Started
Turning phone on & off
Press and hold the red button on the phone
to turn it on/off. It takes several seconds so keep
holding until you hear the sound.
Setting the language, time and date
These are all set for you. The menu language will
default to English. See the full manual if you
would like to change this setting.
The date and time are automatically set to the
local time for the area you are in when the phone
is powered on.
Making a call
Enter the phone number.
Press
q
to start the call.
Press
L
to end the call.
Note!
There is no dial tone. Simply have the phone turned
on and it is ready for use.
Receiving a call
Press
q
to answer.
Press
L
to end the call.
Display Symbols
Signal strength Bluetooth on
Ring only Bluetooth connected
Vib & ring Battery level
Vib only New SMS
Headset
connected
Alarm active
Silent
1.
2.
3.
1.
2.
Text Messaging
Text input tips
Each time you press a key you will scroll through
the three letter options. Once the letter you would
like is highlighted, pause for a moment and it will
be selected. You can then begin pressing a key to
select the next letter.
Press * for a list of special characters. Select the
desired character and press OK to enter it.
Use the + keys – on the side of the phone to
move the cursor within the text you have entered.
Press # to switch the text entry between upper
case, lower case and numbers.
Custom Settings
Silent mode
Use Silent to silence your ring tones.
Vibration and key tone settings are unchanged.
Press and hold
#
to activate/deactivate Silent.
Changing ring tones
You can select from 20 different ring tone options
Follow this sequence to reach the ring tone
customization.
->Menu->Settings->Tone settings
->Tone setup->Ring tone
Use the arrow keys / to scroll between
ring tone options. When you pause on a melody,
you will hear its sound. Once you have found the
ring tone you wish to use, press OK to select.
You can use this same process to customize
the tones for your the Alarm, Opening tone,
Closing tone, Message tone and Keypad
tone in the same way.
Display background (wallpaper)
You can select from 8 different display
backgrounds.
->Menu->Settings->User setup
->Wallpaper
Other Call Options
Voice mail
The voice mailbox can be called by pressing and
holding
1
.
Speed dial
The numerical keys
0
and
2
–
9
can be used for
speed dialing.
Adding speed dial numbers
->Menu->Settings->Speed dial
Select
0
and press Add.
Select an entry from the Phonebook and press OK.
Repeat to add speed dial entries for keys
2
–
9
.
To speed dial an entry, press and hold the
corresponding number key.
Useful Tools
Alarm
Use the Alarm feature to set wake-up call or help
you keep track of an important time.
->Menu->
Toggle it on/off with the arrow keys /
and then select OK. Turning on an alarm will take
you to the edit screen where you will enter the
time you wish the alarm to sound. After entering
the time, select OK to reach the screen where
you can switch between am and pm. Select
Repeated and press OK or Single and press
Save.
If Repeated is selected scroll through the list of
weekdays and press On/Off to enable/disable the
alarm for each weekday, then press Save.
Note!
The alarm function will work even when the phone
is switched off.
Game
->Menu-> ->OK
Select a game (e.g., Robot), then press OK for
settings.
Select Help to learn how to play each game.
Useful Tools
Calendar
Use the Calendar to store tasks to help you keepto help you keep
track of important events..
->Menu-> ->Options->Add task
Use the arrow keys / to enter the date
and time for the task. Press Edit to add text for
the task and then press �one. Press Save to
save the task.
At the recorded date/time, an alert tone will be
played and the task description will be shown on
the display.
Note!
The tasks function will work even when the phone
is switched off.
Calculator
->Menu->
The Calculator can perform basic math
operations. Use the arrow keys / to
scroll between the math options along the
right and select OK when the proper option is
highlighted.
Additional Information
SOS/911 calls
When the phone is turned on, the right soft key
shows SOS before the SIM card is activated or if
the phone lock is on.
Press SOS, then Yes to automatically call 911.
Press No to return to the activation screen.
If you pressed Yes by mistake, press Cancel
immediately to cancel the call.
As long as the phone is on and you are within
reach of cellular service, you can always place an
SOS call by entering 911 followed by
q
.
Note!
Sometimes an emergency call cannot be placed
due to network, environment or interference
issues.
Emergency Call key
The Emergency Call key on the back of the
phone will automatically dial one number for
you. This can be used as a easy way to reach a
family member or friend if you need help. The
Emergency Call function must be activated before
use. See the full manual at
www.ConsumerCellular.com/support OR
www.doro.com for instructions.
Attaching a lanyard to the phone


