


120
Using the Camera with a Computer
8. Right-click the “DCIM” folder.
9. On the shortcut menu that appears, click “Copy”.
10.
Windows 7 / Windows Vista users: Click “Start” and then
“Documents”.
Windows XP users: Click “Start” and then “My Documents”.
Windows 2000 users: Doubleclick “My Documents” to open it.
• If you already have a “DCIM” folder in “Documents” (Windows 7 / Windows
Vista) or “My Documents” (Windows XP / Windows 2000), the next step will
overwrite it. If you want to keep the existing “DCIM” folder, you need to change
its name or move it to a different location before performing the next step.
11.
Windows 7 users: On the “Documents” “Organize” menu, select
“Paste”.
Windows Vista users: On the “Documents” “Edit” menu, select
“Paste”.
Windows XP / Windows 2000 users: On the “My Documents” “Edit”
menu, select “Paste”.
This will paste the “DCIM” folder (and all the image files it contains) into your
“Documents” (Windows 7 / Windows Vista) or “My Documents” (Windows XP /
Windows 2000) folder. You now have a copy of the files that are in camera
memory on your computer.
12.
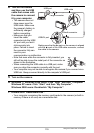
After you finish copying images, disconnect the camera from the
computer.
Windows 7, Windows Vista, Windows XP
On the camera, press [ON/OFF] (Power) to turn off the camera. After making
sure that the back lamp is unlit, disconnect the camera from the computer.
Windows 2000
Click card services in the task tray on your computer screen, and disable the
drive number assigned to the camera. Next, after making sure that the back lamp
is unlit, press the camera’s [ON/OFF] (Power) button to turn off the camera and
disconnect the camera from your computer.
. To view images you copied to your computer
1. Double-click the copied “DCIM” folder to open it.
2. Double-click the folder that contains the images you want to view.